
Remake Learning Day: Equitable CS Education for Broader Workforce Preparation through Design Thinking and Ubiquitous Platforms
Published:
In this article, we will explore tools that enable students to leverage technology in informal contexts that facilitate problem solving in preparation for diverse workforce pathways. Technical solutions and automation aren’t just for Computer Science majors, and there exists a variety of platforms that support exploration and learning as well as productive applications of computing. Our goal is to democratize computing skillsets across all disciplines, and to give students the tools they need to bring computing and technology to their favorite subjects. This has the potential to enhance teaching and learning broadly, and to facilitate participation in computing with inexpensive (or free!) no-code or ubiquitous-code platforms.
We will sample some tools that have been developed and used in Southeastern Pennsylvania to enable students to explore computing concepts and discover solutions to authentic problems, with an aim toward building their confidence in creatively applying technology to workforce-relevant application domains. We will connect these tools to potential careers and career pathways, and conclude with a survey of industry-grade no-code (or ubiquitous-code) platforms for further exploration.
Sections
- Bridging the Classroom and Workforce through Design Thinking
- Platforms and Activities
- Authentic Problems between Industry and K-20 for Broad Careers and Skills
Bridging the Classroom and the Workforce through Design Thinking
Some problems are hard to approach because we lack the complete worldview required to solve them entirely. These are problems that are larger than any one of us, and require collaborative and often multidisciplinary teams. There is no “perfect” textbook solution, and so an iterative cycle of planning, trial, evaluation, and feedback is needed. These authentic problems provide opportunities to develop and apply design thinking skills.
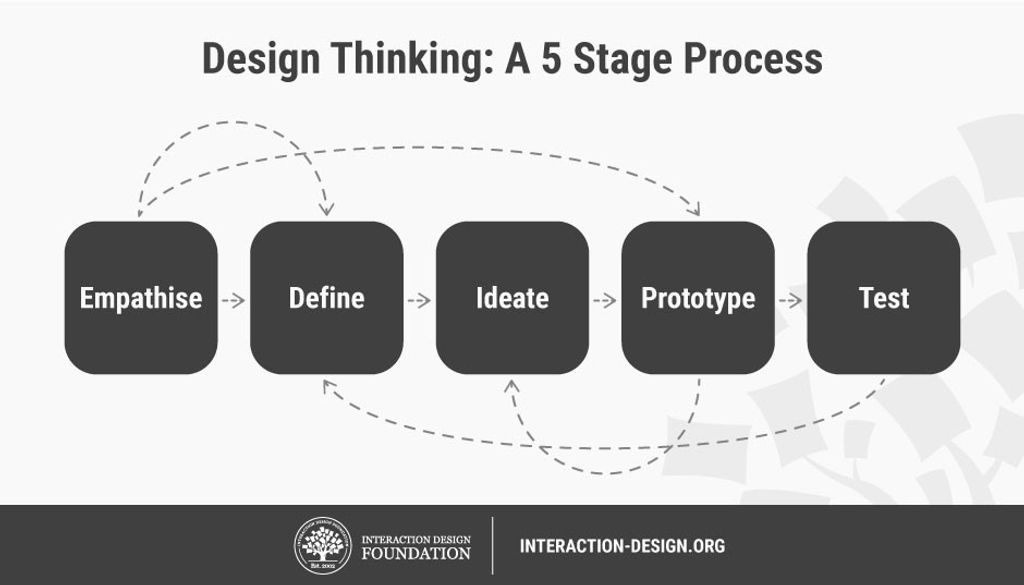
Design Thinking seeks to understand the problem domain, which requires discussion with a variety of stakeholders [1, 2]. We’re not likely to know all the right stakeholder groups until we “live and learn,” and so this is an iterative and perhaps never-ending process. One way to approach this is to experiment and prototype with potential solutions, and then “shop them” to your stakeholder groups for feedback. Learning a new concept, whether it is a lesson on the Federalist Papers, the Pythagorean Theorem, or computer programming, can be considered an opportunity to learn and explore in-context through the Design Thinking process. No-code platforms provide a mechanism to express those designs in an automated and collaborative environment. In essence, we are applying inquiry and discovery learning through the use of technology platforms that are accessible to students across any discipline (in other words, not just the computer class). By viewing problems through the lense of the stakeholder, we bring empathy into the problem space, incorporate a “backwards design” by approaching problems from an outcomes perspective, and facilitate creative innovation in the classroom setting through role playing activities.
This approach enables collaboration across different classroom environments - not just between the STEM students and the context disciplines, but between entire environments. For example, a rural school district familiar with regional challenges (for example, an agricultural or healthcare need) could engage with suburban and urban school districts with their own regional challenges (for example, traffic or environmental needs) to exchange broader perspectives and diversity of thought. Often, the technology and platforms required to approach these challenges is similar across these problem spaces, and exchanging common ideas creates new pathways to collaboration as well as a diversification of perspectives.
Platforms and Activities
Lost-and-Found with the BBC Microbit
If you’ve ever lost your backpack, glasses, or other items, you might be aware of tools designed to help find those items by playing a sound and letting you see how close you are to the missing item. By listening to the sound, you can track down where the missing item is. As you get closer to the source, the sound becomes louder. Sometimes, devices like these emit a radio signal - not an audible sound, but an invisible wave of light, that computers can sense with a radio antenna. As you get closer to the source of the signal, the intensity of the signal increases, just like the sound did. Using the BBC Microbit no-code platform, we will develop a system to communicate a radio signal between two devices to play a game of “hide and seek” where the goal is to locate the source of the invisible signal [3].
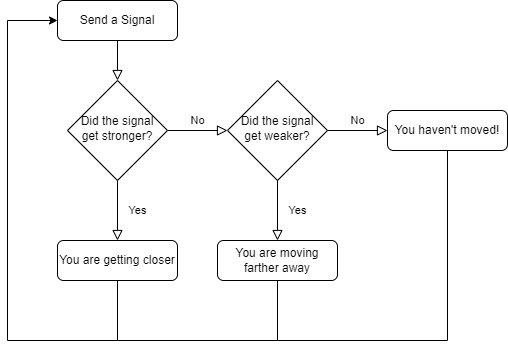
First, students should plan a solution together: what steps are required to play a game of Marco Polo? Without requiring a technical background, some insights can emerge: every so often, the “source” generates a signal that the players can hear (but can’t see); this sound has a direction and intensity that helps the players move closer to the source. As this repeats, if the sound becomes louder, we can infer that we are getting closer.
Let’s make a flow-chart of this idea and lay out the building blocks in the software environment.
We can build each of these steps in the Microbit Makecode environment [3]. We will build this from scratch, but you can import it by clicking the Import button and importing from this URL: https://github.com/billjr99/hide-and-seek. This environment includes a simulator that will run the project without physical hardware, but if you have the devices, they can be downloaded to a physical Microbit by clicking the three dots next to the Download button, and choosing “Connect to Device” from the menu that appears. You’ll need two divices for this project (one to “hide” and one to “seek”).
Getting Started: Sending a Signal
The project opens with two “functions” or slots that we can fill in with behaviors: “on start” and “forever.” The “on start” function will allow us to set up items that we’d like to keep track of during the program, while the “forever” function will dictate what happens over and over. From the flowchart, we can see that everything happens in this “over and over” loop - and is kicked off by sending a signal to our partner. Under the “Radio” section of blocks on the left, there is a “radio send number” behavior that we can drag into the “forever” function. We’re just measuring how loud the signal is: when playing “Marco Polo” the “signal” is to shout the word “Marco,” but in reality, it doesn’t matter what the word is! We’re really listening for the intensity of the sound. So, any number will do here.
In the “on start” section, use the “radio set group” to set what is called the “radio group” - this is like setting the channel on a walkie talkie so that each pair of radios can communicate in isolation. Choose any number here, as it will be the same for both devices.
Finally, if you’re using a real physical Microbit device, using the radio continuously in the “forever” function will drain your batteries very quickly. You can add a “pause” behavior in the “forever” loop to stop in between signals (imagine yelling “Marco” over and over continuously! It’s OK to put a little break in between). I put a 1000 millisecond pause into my loop, so it will send a signal every second. Feel free to adjust this as you like.
Getting Warmer or Colder?
Whenever we receive a signal, we want to ask ourselves whether that signal is “louder” or “softer” than the last time we received it. To do this, we will introduce the concept of “variables.” These are values that we can remember over time. We’re interested in remembering the intensity or “received signal strength indicator” (RSSI) of the last wireless radio signal we received, so we’ll create a variable called lastRSSI. In the “on start” function, add a “set variable” behavior and create this lastRSSI variable. You can give it any starting value that you like, since it will update over time.
We’ll compare this value to the new signal each time we receive one. We’ll set the variable value to the current signal strength as well, so that next time, we can compare that, too. This is like remembering in your mind how loud the “Marco” shout was the last time you heard it, and comparing it to what you’re hearing now. Next time, you’ll compare it to what you just heard, and so on.
You can drag other functions into the canvas; under the “Radio” section, there is a function called “on radio received.” This function will execute any time a new signal is received. It comes with its own variable (known as a “parameter”), called receivedNumber. This is the number that you sent during the “radio send number” behavior. We don’t really need it: it doesn’t matter what the signal was (“Marco” or “Hello” or anything else!), but rather how loud it was!
On our flowchart, we want to ask whether this signal is louder or softer than the last one. The current signal strength can be found in the “received packet: signal strength” behavior under the “Radio” section on the left. Since we’re asking a question about this value, we can use the “if - else” behavior found under the “Logic” section. In the if block, drag the “X > Y” behavior from the “Logic” section and place it inside the diamond shaped space of the if behavior. Inside that, you can place the “received packet: signal strength” value, and the lastRSSI variable.
If the current signal strength is greater than the last one, we’re getting closer! I used the “show arrow: North” behavior to show this on the LED display, and dragged that inside the if block. In the else block, we know that the signal is not stronger, so it is either weaker or the same. I used the “show arrow: South” behavior to show this, and dragged it into the else portion of the if behavior.
Finally, after the if block, I added a “set lastRSSI to” behavior. We want to set this variable to the current signal strength. We checked this value just a moment ago, and itw as called “received packet: signal strength.” Let’s set lastRSSI to the received packet signal strength.
And that’s it! If you run this, you should see arrows on the two devices showing if they are getting “warmer” or “colder.” With physical devices, you can walk around to see this in action. On the simulator, there is a square “wave” in the top right simulating the radio activity. You can click and drag left or right to increase or decrease the signal strength, and you should see the arrows update accordingly.
Optional: What if the Signal Strength Hasn’t Changed?
The if behavior has a cousin called the “if - else if - else” block. This allows us to ask multiple questions in the same if statement. Previously, we asked if the signal was stronger than the previous one, and showed a “North” arrow if it was, and a “South” arrow if it was not. But what if the signals are equal? This if statement can ask if the new signal strength is stronger, and otherwise (“else”) ask if the new signal strength is weaker. In the final “else,” we now know that the signal is neither stronger nor weaker, and must be the same. I displayed a heart icon on the LED display if this was the case, indicating that we’re not getting closer or farther from the target right now.
Optional: Seeing the Signal Strength
You may have seen the concept of RSSI when you choose a wireless network on your phone or computer. Often, you’ll see the classic “bars” of signal strength, which is really just a visualization of the signal strength number that we’ve been comparing in this program. To a computer, everything is a number, and sometimes, you might see the actual number on your computer or on your phone. It’s measured in decibels, and these radio signals are often pretty weak (likely a numeric value between -40 and -100). It’s still amazing to me that these faint invisible signals allow us to carry data over the internet, send music to our radios, and even communicate wirelessly around the world. Even right now, there could be dozens or hundreds (or more!) waves of invisible light energy bouncing around you carrying wireless data by radio signal.
Let’s add a variable to store this value each time we receive a signal. Based on what we’ve done already, where should we create this variable, and when should we update it?
Once you’ve added this variable to the “on start” function and set its value each time the “on radio received” function executes, you can drag another function to the canvas called “on button pressed” that we will use to show the current signal strength value whenever the A button is pressed. Its behavior is just a single step: show the currentRSSI variable value.
Optional: Setting Multiple Radio Groups
Finally, if you’d like a whole class to use this at once, it is helpful to put each pair of radios into a unique radio group, so that two people can play together without “hearing” and displaying the signals from everyone else’s device. To do this, you can change the number in the “radio set group” behavior to a unique value for each pair of devices. Although that change alone is sufficient, I created a variable called radioNumber to do this, just for fun. I had my radio send the radio group number in the “forever” loop, and added an if statement in the “on radio received” function to check that the receivedNumber parameter was equal to the radioNumber variable before checking the signal strength - almost like a little passcode to help ensure that the radio is hearing the correct partner.
The Finished Project
Here’s my finished product:

Extension: How Far Away?
The signal strength will vary based on the distance between the two devices, although walls and other items in the room will also cause the signal strength to change. Roughly speaking, though, the signal strength can be thought of as a proxy to the distance, just like the number of “bars” of signal strength is a rough estimate of how far you are from the cell phone tower or wireless access point (although other artifacts, such as being indoors, will also lower the signal strength and make it appear that you are even farther away).
Older or more experienced students could display the RSSI at a few known distances from their partner, and fit a linear function to those points to get a rough estimate of how changes in the signal strength correspond to distance. Admittedly, the relationship is not truly linear and there are other variables involved, but it is a reasonable estimate using things we can measure.
Add a variable to the “on radio received” function that calculates the distance using the linear equation on the signal strength. Change the “on button pressed” function to display this value instead!
R and SQL in the Browser
During the pandemic, my colleague Chris Tralie developed a Javascript system that allows students to write code in their web browser, which is transpiled to JavaScript from their language of choice (for example, Java and Python) or compiles to WebAssembly and executes in the browser (for example, C++). We connected these modules to our Learning Management System to assign class warmup exercises that are autograded, and that provide “hints” through automated feedback about incorrect answers.
Using Dr. Tralie’s framework, I added support for the R statistical processing language [4] and the SQL database language.
The addition of R and SQL allows students to experiment with database management and data analysis without requiring software installations on their local computer. We will explore the classic Iris flower dataset from R.A. Fisher in 1936 using R [5].
Classifying Data from Features
Imagine holding some coins in your hand. Can you tell what they are without looking at them? How can you tell? You might look for some common “features” like the thickness or the diameter of the coin, or the weight, or even the ridges along the outside of the coin. If the coin is in rough shape, there might be some variance in the data that causes you to guess incorrectly from time to time, but the idea is that we can predict a classification of data by evaluating some known features against examples we’ve seen in the past.
We will use the Iris flower dataset to predict the species of a flower using a few features such as the length and width of the petal. To try this out, navigate to this flower classifier page which is embedded below[6]:
Fill in some numbers for the petal length, petal width, and sepal length for some imaginary flowers. You can select the species for each flower click “Add” each time to plot the flowers by species on the 3D plot (which you can click to rotate and zoom). Take a look at the plot: do your flowers group in a way that makes sense? If the species data points are far away from each other when the species is different, but close together with those of the same species, there’s a good chance you can classify a “mystery flower” between these species choices. Enter numbers for a “mystery flower,” select the species that you think it is, and click “Guess” to see if you can correctly predict them! If not, try refreshing the page, and adding new example flowers whose measurements “group together” by species a bit more closely. Do you have an easier time classifying between them now?
Exploring the Iris Dataset Using R in the Browser
R.A. Fisher’s Iris flower data is built into the R platform, and we have embedded an R webassembly compiler [7] into a webpage [4] for exploration in our courses that use the R language (embedded below).
We will begin by viewing the the Iris dataset for analysis, which is described in detail in this article [5]. To do this, you can type this command into the R console: head(iris), which displays the first few rows of the dataset. It contains columns for the sepal length and width, and the petal length and width, as well as the species of that flower. There are 50 Setosa flowers, 50 Versicolor flowers, and 50 Virginica flowers in the example dataset.
The species column is not numeric, so we can’t plot that. However, we will use the species later to color code our plots. For now, let’s extract the first four columns (the numeric features) into a “dataframe” variable, by typing: df <- iris[, 1:4].
You can graph the columns of this dataset against each other. We’ll use two features at a time so we can more easily view the data on a 2D plot. You can do this by typing: plot(iris$Petal.Length, iris$Petal.Width, col=iris$Species), which plots the petal length against the petal width, and color codes them by species. To see which color represents which species, you can add a legend to the plot by typing: legend("topleft", levels(iris$Species), fill=1:3). How well do you think the Petal Length and Petal Width can help you predict the species of a flower, and why?
Run these commands to see 2D plots of all of the columns against each other (this is called a “pairs plot”). Type this command to generate it: pairs(df, col = rainbow(3)[speciesID], labels=c("PetalLength", "PetalWidth", "SepalLength", "SepalWidth")). Which features do the best job separating the flowers by species?
Replit in the Classroom
Another free platform that I have come to like for web-based pair programming in a variety of languages is replit. I wrote an article describing some helpful tools built into replit, including external library support, unit testing, version control, basic graphics, and a data store [8].
The Internet-of-Things (IoT): Analyzing Live Medical and Environmental Sensors with the VarIOT Platform at Drexel University
I work with a broadly multidisciplinary team on developing textile-based wearable computing systems. Imagine if the “radio” you experimented with earlier using the Microbit could be embedded into your shirt, or into a baby’s onesie, and it was so small that you didn’t know you were wearing it! These ubiquitous computing systems are generally known as the “Internet of Things” (IoT), and are interconnected smart devices that we can use to measure physiological functions like heart or respiratory rate, environmental measurements like air quality, or highway sensors for traffic management. Here, computer scientists team up with physicians, sociologists, designers, engineers, and more, to create solutions that no one group could do on their own. My colleagues at Drexel University run a program using the Vertically Integrated Projects model to provide opportunities for students across majors to blend their classroom experience with authentic problem solving and research skills. In my faculty role at Ursinus College, my students and Drexel’s students collaborate virtually, develop solutions, conduct experiments, and present results, by bringing their own unique classroom and major experiences to the team.
The National Science Foundation (NSF) Science Nation series featured Drexel’s smart fabric Bellyband and the team. The video can be found by clicking below:

Authentic Problems between Industry and K-20 for Broad Careers and Skills
By approaching computing education from a Design Thinking perspective, we can reinforce the “human in the loop” and promote empathetic design choices early in the educational journey. However, this approach also enables viewing problems through a broader lens in which technology is a means rather than an end. Authentic problems can be shared from industry partners, who can participate in a low-committment way by serving as project stakeholders, providing user perspectives to students who can work in multidisciplinary teams to develop solutions.
Another benefit to this approach is that it celebrates the variety of skills inherent in computing; we often think of “programming” as the fundamental skill of computing. And although computer programming is a ubiquitious tool that should be universally understood to facilitate communication about how the computer solves problems, it is not necessary to write code as part of a computing career. One could imagine software design as a core aspect of problem solving with technology, by designing user-centric workflows and determining the basic steps and modules required within a software system, or user experience (UX) design, which centers on interfacing with humans to develop systems that are optimally usable within the constraints of our physiology and psychology, or quality assurance and software testing which plans how to validate that software works correctly, and identifies deficiencies in the software. Information Technology (IT) specialists and systems administrators (and database administrators) ensure that the operational aspects of managing and maintaining the development environment, and front end developers create graphical user interfaces and web-based designs that allow one to engage with the software. Project Managers coordinate the team and ensure that these groups are collaborating efficiently. On top of this, each of these experts must also coordinate with domain experts who understand the target applications of computing systems. All of these people work together to solve problems collaboratively, and each brings a unique and essential skillset to the team. Just as the Vertically Integrated Projects model allows for the integration of and collaboration among a diverse set of technological and domain skillsets, computing and design thinking allow and encourage people to consider problems that are “bigger than themselves.”
You can find out more about these career paths and more here!
References
https://www.billmongan.com/Ursinus-CS474-Spring2022/Activities/DesignThinking ↩
https://public-images.interaction-design.org/literature/articles/heros/5808b55608af6.jpg?tr=w-1024 ↩
https://www.billmongan.com/Ursinus-CS173-Spring2022/assets/js/R/TutorialExercise ↩ ↩2
https://gexijin.github.io/learnR/step-into-r-programmingthe-iris-flower-dataset.html ↩ ↩2
https://www.billmongan.com/Ursinus-CS173-Spring2022/Activities/FlowerClassifier ↩
https://github.com/georgestagg/webR ↩
https://www.billmongan.com/posts/2021/03/replitclassroom/ ↩