CS173: Intro to Computer Science - MIDI Audio (100 Points)
Assignment Goals
The goals of this assignment are:- To implement functions to facilitate code re-use
- To invoke functions that may accept parameters
Background Reading and References
Please refer to the following readings and examples offering templates to help get you started:The Assignment
The Musical Instrument Digital Interface (MIDI) standard enables your computer to play synthesizer music that you can control programmatically.
Adding the MIDI library to your project
We can download libraries of new functions that we can use in our projects; these are packaged conveniently in a single file called a jar file. jar files added to the libs directory of your project will be available for use in your code. Download the MIDILib.jar file into a location you’ll remember (your Downloads directory is fine, or you can use a subdirectory of your project called libs).
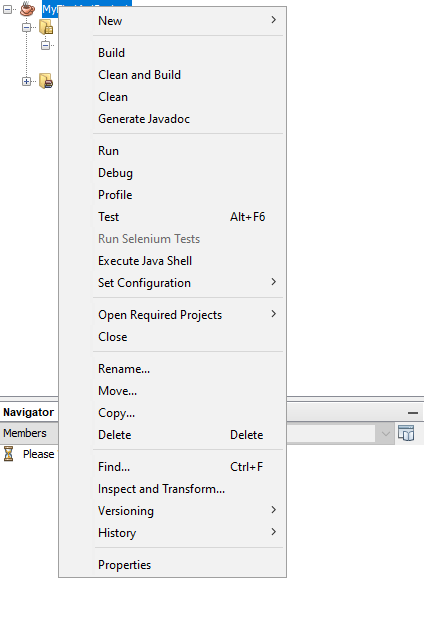
To use this jar, after creating a Java project in NetBeans as usual, right-click on the project in your left project navigation pane (you can click the Window menu and select Projects if you don’t see this), and click Properties, as shown:
Click the Libraries category on the left side of the window that appears. Then click, the + sign next to the word Classpath, and click Add JAR/Folder, as shown:
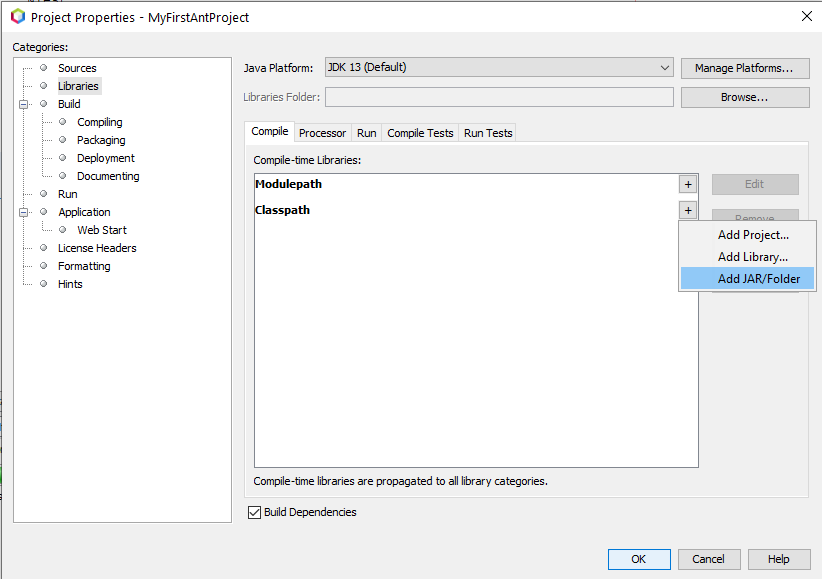
Finally, navigate to the jar file you downloaded earlier, and double click on it to add it to your project. Click OK to close the window, and you’re done!
To learn what functionality our new jar file has provided us, see the Javadoc for more information about the library [1, 2, 3, 4, 5, 6].
Instantiating a MIDIPlayer object
The MIDI library you imported includes a MIDIPlayer class that you can instantiate to help you play sounds through your computer. You can create one like you would any object variable, with the new keyword:
MIDIPlayer player = new MIDIPlayer();
Be sure to add the import for MIDIPlayer to your program (we’ll go ahead and add the imports for the other library classes that we’ll need later as well):
// These lines go above and outside of your public class line, right below the package line
// They give you access to our library functions in your code

import com.MIDI.MIDIPlayer;
import com.MIDI.Instruments;
import com.MIDI.Notes;
Open the Javadoc to find out about the method interface this library provides. There are a number of methods you can call inside the MIDIPlayer class. What are a few of them, and, in your own words, what do they do?
In addition, there are two classes Instruments and Notes which contain constants that represent some of the instruments, notes, and note durations that you can play. These include Notes.NOTE_C4 for a C4 note, Instruments.GUITAR for a guitar, and Notes.NOTE_QUARTER which specifies a quarter note duration. Click on the Instruments and Notes javadoc classes and make a note of some of the instruments and notes that are available to you. Because it’s a synthesizer, some of the “instruments” are actually creative sound effects - feel free to have fun with this!
Javadoc documentation is really helpful because it enables you to observe functionality made available by a library “at a glance.” You can see how methods are named, information about how they are invoked, and what parameters they require. These are generated programmatically through comments that you write throughout your code, and this is prescribed by the Style Guide.
Part 1: Playing a Note
Let’s test the interface and the computer sound setup by playing a note using a synthesized instrument. The MIDI interface works by defining a number of “channels” on which you can play notes, chords, and sounds. You can think of a channel as a particular instrument. In fact, you can assign an instrument to a channel. The default channel is “channel 0,” but you can have several more of them, referenced by number. In this assignment, we will stick with the default channel, but feel free to see me if you are interested in extending this to multiple channels and instruments.
To do this, you can first set an instrument on the default channel by calling the following method of the MIDIPlayer library:
player.setInstrument(Instruments.HARP);
Here, Instruments.HARP is the instrument that you want to use. This will assign the harp to the default channel 0. To play a note, you can call the following function:
player.playNote(Notes.NOTE_C4, Notes.NOTE_QUARTER, Notes.DEFAULT_INTENSITY);
This will play a C4 quarter note, using a default intensity value.
Try it and verify that you get sound output. Try changing this to play an A4 whole note at half intensity (you can divide Notes.DEFAULT_INTENSITY by 2). The A4 note is a higher pitched note, and this is because A4 is a higher frequency vibration which your ear perceives as a higher pitch. In fact, A4 is defined here as 440 Hz, and, consequently, C4 (known as “middle C”) is ~262 Hz. Every note is defined by its own fundamental frequency. Incidentally, there is repitition here: if A3 is 220 Hz, what frequency do you think C3 is? How about A2? You can try listening to some notes and frequencies using this online tone generator.
Part 2: Playing a Song
Using the playNote function, try playing the first part of the “alphabet song,” (actually, it’s basically Twinkle Twinkle Little Star) which plays the following quarter notes: C4 C4 G4 G4 A4 A4 G4.
Now, try adding the second part: F4 F4 E4 E4 D4 D4 D4 D4 C4. Note that there are more notes in this part than the first: to align the time, the D4 notes should be eighth notes instead of quarter notes.
There should have been a brief pause between the first part (C4 C4 G4 G4 A4 A4 G4) and the second part (F4 F4 E4 E4 D4 D4 D4 D4 C4). The following function call will introduce a “rest” or pause (in this case, equivalent to an eighth note duration) in between the parts:
MIDIPlayer.rest(Notes.NOTE_EIGHTH);
Try inserting this in between the parts.
You might notice that we are calling MIDIPlayer.rest() while we call player.playNote() elsewhere. Both come from the same code library, so what’s the difference? Take a look at the Javadoc and notice that the rest() method is a static function. This means that the rest() method is not specific to a particular MIDIPlayer, and so it belongs to the class rather than to the object. A “rest” does not actually play a sound, so you are not using the variables and methods of the MIDIPlayer object variable to accomplish this. It’s generic to any MIDIPlayer, so it’s not necessary to call the function on any particular variable. Notice that the constants in Instruments and Notes are also static - they aren’t unique to any one MIDIPlayer - every student is using the same ones regardless of the computer they’re using or the program they’re writing. As a rule of thumb: if you don’t need to call new to get a variable first in order to use a method or variable from that class, it could probably be declared static.
Finish the alphabet song. Here are the notes, which are quarter notes unless otherwise specified (I suggest adding an eighth note duration rest in between each part):
C4 C4 G4 G4 A4 A4 G4(1/2 note)
F4 F4 E4 E4 D4(1/8th note) D4(1/8th note) D4(1/8th note) D4(1/8th note) C4(1/2 note)
G4 G4 F4 (rest 1/16th note) E4 E4 D4(1/2 note)
G4(1/8th note) G4(1/8th note) G4(1/8th note) F4 (rest 1/16th note) E4 E4 D4(1/2 note)
C4 C4 G4 G4 A4 A4 G4(1/2 note)
F4 F4 E4 E4 D4 D4 C4(1/2 note)
For fun, try changing the instrument to a guitar before playing the song:
player.setInstrument(Instruments.GUITAR);
Compare the result to Twinkle Twinkle Little Star (there is a MIDI rendition on the Wikipedia page that you can play!). There are a few small differences to make the alphabet fit into the song - can you spot them? What would you change in your program to match Twinkle Twinkle Little Star?
Part 3: Using Functions to Enable Code Re-Use and Repitition
Did you notice that part of the song repeats? The first part is exactly the same as the fifth part! You can avoid having to do this extra work of copying and pasting your code using functions. In addition to saving you some typing, functions a standard good practice in case it becomes necessary to change that part of the song in a way that affects every use of the part. With a function, you can change the song once, and have it play correctly both times that you use it.
Define a function playMainPart() that contains the code to play the C4 C4 G4 G4 A4 A4 G4 part, and modify your program so that you call this function each of the two times you want to play that part in the song.
This function should accept one parameter of type MIDIPlayer, and when you call it from main, pass the player variable to it. This way, your function will have access to the player variable!
Part 4: Creating Your Own Function to Generate Note Values
The Notes and Instruments classes provide a number of sample notes and instruments that you can play, but you may need one that is not provided there. These notes and instruments (for example, NOTE_C4 and GUITAR) are just variable names that correspond to int variables, so you can provide your own numeric values here if you’d like to specify other notes or instruments! For example:
player.setInstrument(25); // steel acoustic guitar
player.playNote(101, Notes.NOTE_QUARTER, Notes.DEFAULT_INTENSITY); // F7 note
You will find a complete list of notes (the numeric value is the first column, and the note is the fourth column), and instruments (see the instrumentNames variable halfway through the code listing), in case you would like to customize. Note, however, that this is completely optional: it is perfectly OK to use only the notes and instruments I’ve provided in the library. I provide these references only for your entertainment in case you would like to get creative here!
Write your own function called generateNote that accepts a double parameter for the frequency (for example 880.0), and returns the MIDI note number (in this example, 81) from the first column of this list of notes. Call this function from main and store the result in a variable.
The formula you will implement in your generateNote function to convert a frequency f to a MIDI note number n is as follows:
\(n = 12 log2(\frac{f}{440.0}) + 69\)
Java’s Math.log() function uses base 10 instead of base 2, so you can do a simple conversion so that you can use the Math.log() function in your implementation:
\(n = 12 \frac{log(\frac{f}{440.0})}{log(2)} + 69\)
Then, pass that variable to the first parameter of playNote like this:
player.setInstrument(25); // steel acoustic guitar
int note = generateNote(880.0); // you'll write this function!
player.playNote(note, Notes.NOTE_QUARTER, Notes.DEFAULT_INTENSITY); // F7 note
Part 5: Make Up Your Own Song
Every answer is correct - be creative and play some notes. Explore the Notes class and the Instruments class for a few examples that you can play. Let me know if you come up with something fun that you’d be willing to share - we can take a few minutes in class sometime for a few “code demonstrations.”
If you’d like to use your custom notes, you can look up the MIDI note numbers under the first column in this list of notes, and pass those to the playNote function, or call generateNote to obtain them given a frequency, if you are musically inclined!
Part 6 (Optional): Just for Fun…
When we explore arrays and loops, we will see how we can represent a song like this using a single variable (an “array”) that represents the entire collection of notes, and this can be played using a single call to the function to play all the notes. “Loops” can iterate over these collections, one by one, and automatically play each note, so that you don’t have to copy your code like you did here.
If you’d like to try out chords using arrays, try running the following code in your program:
player.setInstrument(Instruments.GUITAR);

int chordNotes[] = {Notes.NOTE_C4, Notes.NOTE_E4, Notes.NOTE_G4};
player.playChord(chordNotes, Notes.NOTE_WHOLE, Notes.DEFAULT_INTENSITY);
You may not be familiar with the notation yet, but we are asking the synthesizer to play three notes instead of just one. This is called a chord (in this case, the chord is comprised of the C4, E4, and G4 notes). chordNotes is called an array: it is a variable that contains a collection of multiple values, rather than just a single value.
If you are familiar with older versions of Microsoft Windows, you might be familiar with these sounds (OK, this rendition is far from faithful, but I am admittedly not musically inclined! You may need to use your imagination here…):
player.setInstrument(Instruments.BRIGHT_PIANO);

player.playNote(Notes.NOTE_D4, Notes.NOTE_QUARTER, Notes.DEFAULT_INTENSITY);
player.playNote(Notes.NOTE_D3, Notes.NOTE_SIXTEENTH, Notes.DEFAULT_INTENSITY);
player.playNote(Notes.NOTE_A3, Notes.NOTE_SIXTEENTH, Notes.DEFAULT_INTENSITY);
player.playNote(Notes.NOTE_G3, Notes.NOTE_EIGHTH, Notes.DEFAULT_INTENSITY);
player.playNote(Notes.NOTE_D3, Notes.NOTE_EIGHTH, Notes.DEFAULT_INTENSITY);
player.playNote(Notes.NOTE_D4, Notes.NOTE_EIGHTH, Notes.DEFAULT_INTENSITY);
int[] notes = {Notes.NOTE_A4, Notes.NOTE_A3};
player.playChord(notes, Notes.NOTE_HALF, Notes.DEFAULT_INTENSITY);

MIDIPlayer.rest(Notes.NOTE_WHOLE);

player.playNote(Notes.NOTE_G4, Notes.NOTE_EIGHTH, Notes.DEFAULT_INTENSITY);
player.playNote(Notes.NOTE_D4, Notes.NOTE_EIGHTH, Notes.DEFAULT_INTENSITY);
player.playNote(Notes.NOTE_G3, Notes.NOTE_EIGHTH, Notes.DEFAULT_INTENSITY);
player.playNote(Notes.NOTE_A3, Notes.NOTE_HALF, Notes.DEFAULT_INTENSITY);

MIDIPlayer.rest(Notes.NOTE_WHOLE);
Take a look at the playChord function call. What is different about it from the calls to playNote? We know that it is playing multiple notes together (in this case, A4 and A3). How do we know this?
Finishing Touches and Writeup
Don’t forget to test your program with several different inputs to help verify that things work the way you expect! Think in terms of trying to break your program; if it’s really hard to “trick” your program into getting the wrong answer, you’ve probably done a good job making your code robust.
Also, check the Style Guide to make sure that you’ve written high quality code; make sure your code is “readable,” well indented, uses good variable names, and includes good comments throughout the program.
When you’re done, write a README for your project, and save all your files, before exporting your project to ZIP. In your README, answer any bolded questions presented on this page. In addition, write a few paragraphs describing what you did, how you did it, and how to use your program. If your program requires the user to type something in, describe that here. If you wrote functions to help solve your problem, what are they, and what do they do? Imagine that you are giving your program to another student in the class, and you want to explain to them how to use it. What would you tell them? Imagine also that another student had given you the functions that you wrote for your program: what would you have wished that you knew about how to call those functions?
Exporting your Project for Submission
Here is a video tutorial describing how to write a README for your project, and how to export it. Be sure to save your README file before exporting the project, so that your work is included in the submission!
-
http://math.hws.edu/eck/cs124/f17/lab8/lab8-files/midi/SimpleSynth.java ↩
-
https://www.inspiredacoustics.com/en/MIDI_note_numbers_and_center_frequencies ↩
-
http://www.cs.albany.edu/~sdc/CSI201/Spr12/201Stuff/bookClassesJavaFiles/MidiPlayer.java ↩
-
https://stackoverflow.com/questions/2064066/does-java-have-built-in-libraries-for-audio-synthesis/2065693#2065693 ↩
-
https://stackoverflow.com/questions/22467633/java-midi-player-program ↩
Submission
In your submission, please include answers to any questions asked on the assignment page in your README file. If you wrote code as part of this assignment, please describe your design, approach, and implementation in your README file as well. Finally, include answers to the following questions:- Describe what you did, how you did it, what challenges you encountered, and how you solved them.
- Please answer any questions found throughout the narrative of this assignment.
- If collaboration with a buddy was permitted, did you work with a buddy on this assignment? If so, who? If not, do you certify that this submission represents your own original work?
- Please identify any and all portions of your submission that were not originally written by you (for example, code originally written by your buddy, or anything taken or adapted from a non-classroom resource). It is always OK to use your textbook and instructor notes; however, you are certifying that any portions not designated as coming from an outside person or source are your own original work.
- Approximately how many hours it took you to finish this assignment (I will not judge you for this at all...I am simply using it to gauge if the assignments are too easy or hard)?
- Your overall impression of the assignment. Did you love it, hate it, or were you neutral? One word answers are fine, but if you have any suggestions for the future let me know.
- Any other concerns that you have. For instance, if you have a bug that you were unable to solve but you made progress, write that here. The more you articulate the problem the more partial credit you will receive (it is fine to leave this blank).
Assignment Rubric
| Description | Pre-Emerging (< 50%) | Beginning (50%) | Progressing (85%) | Proficient (100%) |
|---|---|---|---|---|
| Algorithm Implementation (60%) | The algorithm fails on the test inputs due to major issues, or the program fails to compile and/or run | The algorithm fails on the test inputs due to one or more minor issues | The algorithm is implemented to solve the problem correctly according to given test inputs, but would fail if executed in a general case due to a minor issue or omission in the algorithm design or implementation | A reasonable algorithm is implemented to solve the problem which correctly solves the problem according to the given test inputs, and would be reasonably expected to solve the problem in the general case |
| Code Indentation and Spacing (10%) | Code indentation and spacing are generally inappropriate or inconsistent | Code indentation or spacing are generally appropriate but inconsistent in a few isolated instances | Code indentation or spacing are appropriate or consistent, with minor adjustments needed | Code indentation and spacing are appropriate and consistent |
| Code Quality (10%) | Prior code quality feedback and style guide standards are not reflected in the submitted code to a great extent | Code quality conforms to several standards in the course Style Guide, and progress is demonstrated in improving code quality from prior feedback | Code quality conforms to the standards in the course Style Guide to a great extent, with a few identified areas of improvement | Code quality substantially conforms to the standards in the course Style Guide |
| Code Documentation (10%) | Code commenting and structure are absent, or code structure departs significantly from best practice | Code commenting and structure is limited in ways that reduce the readability of the program; specifically, javadoc style comments are present for some functions | Code documentation is present that re-states the explicit code definitions | Code is documented at non-trivial points in a manner that enhances the readability of the program; specifically, javadoc style comments are present for all functions |
| Writeup and Submission (10%) | An incomplete submission is provided, or the README file submitted is blank | The program is submitted, but not according to the directions in one or more ways (for example, because it is lacking a readme writeup or missing answers to written questions) | The program is submitted according to the directions with a minor omission or correction needed, including a readme writeup describing the solution and answering nearly all questions posed in the instructions | The program is submitted according to the directions, including a readme writeup describing the solution and answering all questions posed in the instructions |
Please refer to the Style Guide for code quality examples and guidelines.