CS173: Intro to Computer Science - Financial Aid Calculator (100 Points)
Assignment Goals
The goals of this assignment are:- To implement an arithmetic expression into executable code
- To map variables to expression parameters
- To identify and implement appropriate unit test cases
The Assignment
If (and only if) you are using GitHub to submit, you can clone this assignment from GitHub Classroom at https://classroom.github.com/a/f2o9Azh6. Otherwise, you may skip this step!In this lab [1], you will practice with if statements and if/else statements, as well as with unit tests with JUnit. It will also serve as practice writing and calling functions (also known as “methods”).
A non-governmental organization got a large donation to help families in need, but they have so many families to help that they need a program to help automate calculating the amount of financial assistance for each family. The amount of aid depends both on the annual household income and the number of children in the family. The rules are as follows:
- If the annual household income is greater than $40,000, then no aid is provided.
- If the annual household income is between $30,000 (inclusive) and $40,000 (inclusive), then apply the following rules:
- If the household has three or more children, provide $1,000 per child.
- If the household has two or fewer children, provide $500 per child.
- If the annual household income is from $20,000 (inclusive) to $30,000 (not inclusive), then apply the following rules:
- If the household has at least two children, then provide $1,500 per child.
- If the household has only one child (don’t forget to use
==for this!), then provide $2,000 total. - If the household has no children, then no aid is provided.
- If the annual household income is less than $20,000, then provide $2,100 per child.
Hint: remember that numeric values in Java do not include the commas; these are only there for your reading convenience!
Part 0: Getting Started
Create a new NetBeans project, but select a Maven project instead of a Gradle project for this one (some installations do not support the unit test framework in Gradle). Right click on your package name under the project Source Packages, and click New and then New Class. Call the class Main and click OK to get started.
Part 1: Soliciting User Input (15% of the Implementation Grade)
In main(), complete an input prompt asking the user to input an integer representing the number of kids who need assistance (this is by far the quicker part). You will pass these values to your computeAssitance function, and print the resulting financial assistance returned by computeAssistance. Here is a guide on reading user input - consider the nextDouble() function which will read a number from the user keyboard and return a double variable for you to use, and the nextInt() function which returns an int. For example:
// don't forget to import java.util.Scanner; at the top (under the package line!)

// the code below goes in your main() function
Scanner myScanner = new Scanner(System.in);
System.out.println("Enter Annual Income:");
double income = myScanner.nextDouble();
// do this again using nextInt() for numKids
To enable the Scanner in NetBeans, so that you can input values in the output pane at the bottom of NetBeans, you can add the following line at the very bottom of your build.gradle file, if you are using Gradle (if you are not using Gradle project, you can skip this step!):
run.standardInput = System.in;
Part 2: Financial Assistance Calculator (85% of the Implementation Grade)
Create a method double computeAssistance(double income, int numKids). This function will go inside your class, along with your main() function. Fill in the method that computes the proper amount of assistance, following the rules above.
/* Compute the amount of financial assistance given to a family,
 * given their income and number of children.
 * @param income The annual family income
 * @param numKids The number of children in the family
 * @return The amount of financial assistance in dollars and cents (a double)
 */
public static double computeAssistance(double income, int numKids) {
    double assistanceAmount = 0.0; // We'll start with $0 assistance as a placeholder value

    // Your code goes here; update assistanceAmount to the correct value according to the rules above
    // You can just update assistanceAmount inside the if statements, since we declared it at the top of this function.

    return assistanceAmount;
}
Hints
It is possible to do this assignment with a single stream of if/else blocks that use boolean expressions, but you may instead want to do it with nested if statements in some of them (it’s your choice). Recall that a nested if statement is a statement such as the following:
if (a > b) {
    // Outer block
    if (c > d) {
        // Inner block 1
    }
    else {
        // Inner block 2
    }
}
In this example, we don’t even check c > d unless a > b passes. Just for contrast, the way to get to inner block 1 without nested if statements is with a boolean expression:
if (a > b && c > d) {
    // Inner block 1
}
Part 3: Unit Tests
Coming up with proper test cases is an important part of software engineering that, when done properly, saves everyone a huge headache. Good software testing frameworks allow the programmer to write a whole battery of tests that get applied every time the code is changed so that they don’t have to manually input all of the tests every time. In NetBeans, we have access to one such test framework known as JUnit, which runs a battery of tests completely separately from the main function. You can create a test suite in Netbeans and write your tests there.
Creating Unit Tests
Here is a guide on creating unit tests in NetBeans using JUnit. Follow it first to create a unit test class with functions to test your program. You don’t have to enter the code that you see there - that’s for a test project that the tutorial walks through; instead, we’ll give you test case code to use below right here on this lab page.
Running Unit Tests
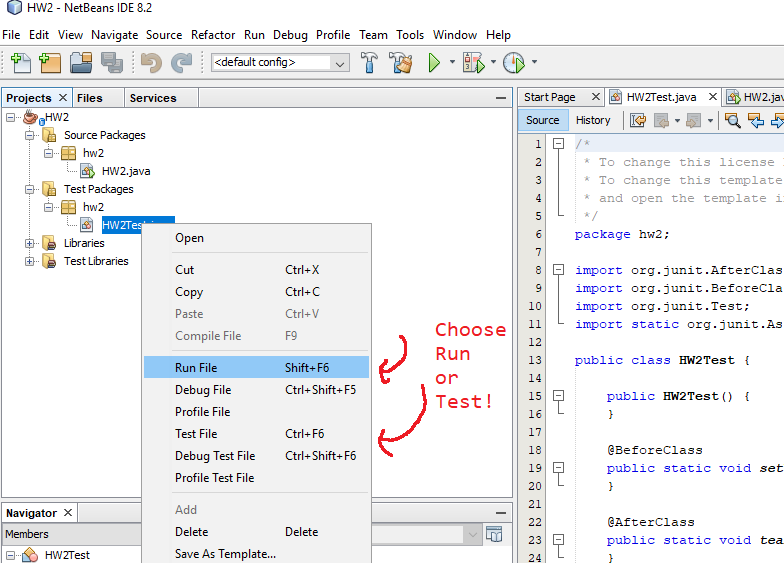
To run the unit tests, right click on this unit test file (this is not the main class file that you normally edit in your project, but rather the unit test class file that you just created above!), and select Test File, as shown below (it may be called Run File as well, which is also fine!).
The results of all of the tests will be shown in the console. For instance, for the default skeleton code, I provided two tests, and one of them fails:

The reason for this behavior is as follows. By default, the code returns a “placeholder value” of $0.0 for all income levels and number of children. The first test has a high income that should receive zero aid, so this passes just fine. However, the second case has a mid level income of $35,000 with 5 kids, that should receive a total of $5,000 in aid by the rules above. In this case, the placeholder value of $0.0 is definitely not correct, so this second test will fail until you update your code.
To get full credit for this part of the assignment, you must create enough unit tests so that every block of code you write is covered by at least one test. In other words, every if and else statement should be tested by at least one of your test cases, so create a @Test function with sample values that exercise every part of your code.
Using Maven, the @Test annotation might be called @org.junit.jupiter.api.Test, which is fine; use this if that is what you see here!
If there is a testMain test, you can remove that. It is only necessary to test the computeAssistance function, since main just obtains user input and then passes them to the computeAssistance function. So these tests automatically run your function for you without asking for input!
The reference solution has 6 test cases, including the first two that are provided. The easiest way to create a new test case is to simply copy and paste the code for a test case that’s already there (starting with @Test and continuing through the end curly brace } ) and to rename it and update the test values. It is recommended that you do this as you are going along. This will really help you when debugging, and it’s a lot easier than inputting values into the console over and over again.
Extra Credit (10%)
Print the money with commas in appropriate spots. For example, print $12,000 instead of $12000. You can assume that the amount of aid is less than a million dollars, so that you will need at most one comma. You may find this guide helpful, using a function called System.out.printf.
-
Developed by Prof. Chris Tralie and Prof. Ann Marie Schilling ↩
Submission
If you wrote code as part of this assignment, please include a README in which you describe your design, approach, and implementation. Additionally, please answer any questions from the assignment, and include answers to the following questions:- If collaboration with a buddy was permitted, did you work with a buddy on this assignment? If so, who?
- Approximately how many hours it took you to finish this assignment (I will not judge you for this at all...I am simply using it to gauge if the assignments are too easy or hard)?
- Your overall impression of the assignment. Did you love it, hate it, or were you neutral? One word answers are fine, but if you have any suggestions for the future let me know.
- Any other concerns that you have. For instance, if you have a bug that you were unable to solve but you made progress, write that here. The more you articulate the problem the more partial credit you will receive (it is fine to leave this blank).
Assignment Rubric
| Description | Pre-Emerging (< 50%) | Beginning (50%) | Progressing (85%) | Proficient (100%) |
|---|---|---|---|---|
| Algorithm Implementation (40%) | The algorithm fails on the test inputs due to major issues, or the program fails to compile and/or run | The algorithm fails on the test inputs due to one or more minor issues | The algorithm is implemented to solve the problem correctly according to given test inputs, but would fail if executed in a general case due to a minor issue or omission in the algorithm design or implementation | A reasonable algorithm is implemented to solve the problem which correctly solves the problem according to the given test inputs, and would be reasonably expected to solve the problem in the general case |
| Test Cases (20%) | Testing was performed outside of the unit test framework, or not performed at all | Trivial test cases are provided in a unit test framework | Test cases that cover some, but not all, boundary cases and branches of the program are provided | Test cases that cover all boundary cases and branches of the program are provided |
| Code Quality and Documentation (30%) | Code commenting and structure are absent, or code structure departs significantly from best practice, and/or the code departs significantly from the style guide | Code commenting and structure is limited in ways that reduce the readability of the program, and/or there are minor departures from the style guide | Code documentation is present that re-states the explicit code definitions, and/or code is written that mostly adheres to the style guide | Code is documented at non-trivial points in a manner that enhances the readability of the program, and code is written according to the style guide |
| Writeup and Submission (10%) | An incomplete submission is provided | The program is submitted, but not according to the directions in one or more ways (for example, because it is lacking a readme writeup) | The program is submitted according to the directions with a minor omission or correction needed | The program is submitted according to the directions, including a readme writeup describing the solution |