CS375: Software Engineering - git (100 Points)
Contents
Assignment Goals
The goals of this assignment are:
- To use git to set up a shared software repository
- To work at the command line and write a simple shell script
- To collaborate on a software team through GitHub Issues and Pull Requests
Background Reading and References
Please refer to the following readings and examples offering templates to help get you started:
- Git Reference Book
- Using Git with Github by William M. Mongan
- Git Workshop from Bryn Mawr College
- The Missing Semester of Your CS Education (MIT)
- About Issues (GitHub Docs)
- About Pull Requests (GitHub Docs)
The Assignment
In this assignment, you will get comfortable at the command line, set up a git repository, share it with others, and practice commit, push, and pull operations from the repository.
You will also create and add an ssh key to your git repository for password-less access.
You will induce and resolve a merge conflict with your partners, and practice the collaboration workflow that real teams use every day: tracking work with Issues and reviewing changes through Pull Requests.
Background
The Command Line
Before we use git, we need to be comfortable at the command line (also called the shell or terminal): the text interface where you type a command, the computer runs it, and prints the result. Every professional software toolchain – git, Docker, continuous integration, cloud deployment – is driven from the shell, because text commands are precise, scriptable, and reproducible in a way that clicking through a graphical interface is not. On macOS and Linux you already have a shell (the Terminal app); on Windows, install Git for Windows, which includes “Git Bash,” or enable the Windows Subsystem for Linux (WSL).
Where am I, and what is here? Your shell always has a working directory – the folder you are currently “in.”
pwd                 # print working directory: where am I right now?
ls                  # list the files here
ls -la              # list all files (including hidden .dotfiles) in long form, with sizes and dates
Moving around (directory traversal). Directories form a tree; you move through it with cd (change directory):
cd myproject        # move into the myproject folder
cd ..               # move up one level, to the parent
cd ~                # go to your home directory
cd -                # jump back to the previous directory
A path names a location. . means “here,” .. means “one level up,” ~ means your home directory, a leading / is an absolute path from the root of the filesystem, and anything else is relative to your working directory.
Managing files and folders.
mkdir notes         # make a new directory
mv old.txt new.txt  # move or rename a file
cp a.txt b.txt      # copy a file
rm scratch.txt      # remove a file (there is no undo -- be careful!)
cat README.md       # print a whole file to the screen
less README.md      # page through a long file (press q to quit)
Finding things. Two tools do the heavy lifting. find locates files by name or attribute; grep searches inside files for lines matching a pattern:
find . -name "*.js"          # every .js file at or below the current directory
grep -r "TODO" .             # every line containing TODO, searched recursively
grep -rn "login" src/        # ...with -n for line numbers, limited to the src/ folder
Editing in the terminal with vim. When git needs you to write a commit message, or you need to edit a file on a remote server with no graphical editor, it often opens vim. It has two ideas you must know to escape it: you start in normal mode (keys are commands), and press i to enter insert mode (keys are text). Press Esc to return to normal mode, then type :wq and Enter to write and quit (or :q! to quit without saving). That is enough to survive; everything else is a bonus.
Pipes and filters – the superpower. Each command reads an input stream and writes an output stream. A pipe (|) connects one command’s output to the next command’s input, letting you build a custom tool out of small pieces. A redirect (> or >>) sends output to a file instead of the screen:
ls | wc -l                       # count how many files are here (wc -l counts lines)
grep -rn "TODO" . | wc -l        # how many TODOs are left in the project?
history | grep git | tail -20    # the last 20 git commands you ran
cat names.txt | sort | uniq      # sort the lines and drop duplicates
echo "hello" > greeting.txt      # write "hello" to a file (> overwrites, >> appends)
wc, sort, uniq, head, and tail are filters: they transform a stream. Chaining filters with pipes is how you answer questions about your project without writing a whole program. sed (the stream editor) is another filter – most often used for find-and-replace as text flows past:
sed 's/localhost/example.com/g' config.txt # print config.txt with every localhost replaced
Making a script runnable: permissions, the shebang, and PATH. A file is only executable if it has the “execute” permission bit, which you set with chmod:
chmod +x deploy.sh   # mark deploy.sh as executable
./deploy.sh          # run it (the ./ says "the one in this directory")
The first line of a script, the shebang (#!/usr/bin/env bash), tells the system which interpreter should run it. Your PATH is the list of directories the shell searches for commands; that is why you can type git from anywhere (it lives in a directory on your PATH), but must type ./deploy.sh for a script in the current directory that is not on your PATH.
Writing a Shell Script
A shell script is just a file containing the same commands you would type by hand, saved so you can re-run them reliably. Let us build one that does something you will actually need: for the weekly Standup Reflection, each teammate summarizes what they did in the past week. We will write standup.sh, which prints a teammate’s git activity over the last week – turning several commands and pipes into a single reusable tool.
Create the file (with vim standup.sh, or the editor of your choice) and start with the shebang plus a line that makes the script fail fast if anything goes wrong – a habit professionals rely on so a broken step never silently continues:
#!/usr/bin/env bash
set -euo pipefail   # -e: stop on error, -u: error on undefined variables, -o pipefail: a failed command in a pipe fails the whole pipe
Next, read the author to report on from a command-line argument. Inside a script, $1 is the first argument the user supplies, so ./standup.sh "Ada" makes $1 equal to Ada. We check that an argument was given and, if not, print usage and exit with a non-zero exit status (which is how a program signals failure):
if [ -z "${1:-}" ]; then
  echo "Usage: ./standup.sh \"<author name or email>\""
  exit 1
fi
AUTHOR="$1"
SINCE="1 week ago"
Now the heart of the script: ask git for that author’s commits in the last week. git log with --author and --since filters the history, and --oneline prints one compact line per commit:
echo "Standup for $AUTHOR since $SINCE:"
git log --author="$AUTHOR" --since="$SINCE" --oneline
How many commits was that? Pipe the same log through wc -l to count the lines – exactly the pipe-and-filter idea from the previous section:
COUNT=$(git log --author="$AUTHOR" --since="$SINCE" --oneline | wc -l)
echo "Total commits: $COUNT"
Finally, show which files they touched, so the reflection can talk about specifics. --name-only lists changed files; we pipe through sort -u to de-duplicate and sed to delete blank lines (a filter you just learned):
echo "Files changed:"
git log --author="$AUTHOR" --since="$SINCE" --name-only --pretty=format: | sort -u | sed '/^$/d'
Putting it together, standup.sh is:
#!/usr/bin/env bash
set -euo pipefail

if [ -z "${1:-}" ]; then
  echo "Usage: ./standup.sh \"<author name or email>\""
  exit 1
fi
AUTHOR="$1"
SINCE="1 week ago"

echo "Standup for $AUTHOR since $SINCE:"
git log --author="$AUTHOR" --since="$SINCE" --oneline

COUNT=$(git log --author="$AUTHOR" --since="$SINCE" --oneline | wc -l)
echo "Total commits: $COUNT"

echo "Files changed:"
git log --author="$AUTHOR" --since="$SINCE" --name-only --pretty=format: | sort -u | sed '/^$/d'
Make it executable and run it against a teammate (use the name or email they commit with):
chmod +x standup.sh
./standup.sh "Ada Lovelace"
You have just automated a weekly chore with the shell. The same pattern – arguments, variables, a pipeline of small tools, and a clear exit status – is exactly how teams script their builds, tests, and deployments, and it is why the same run these checks script can run on your laptop, as a continuous integration step, and inside a Docker image.
Installing git
If you do not already have git installed (for example, if you open a terminal and type git, but the command does not execute), you can install it from https://git-scm.com/.
Adding your ssh key to github
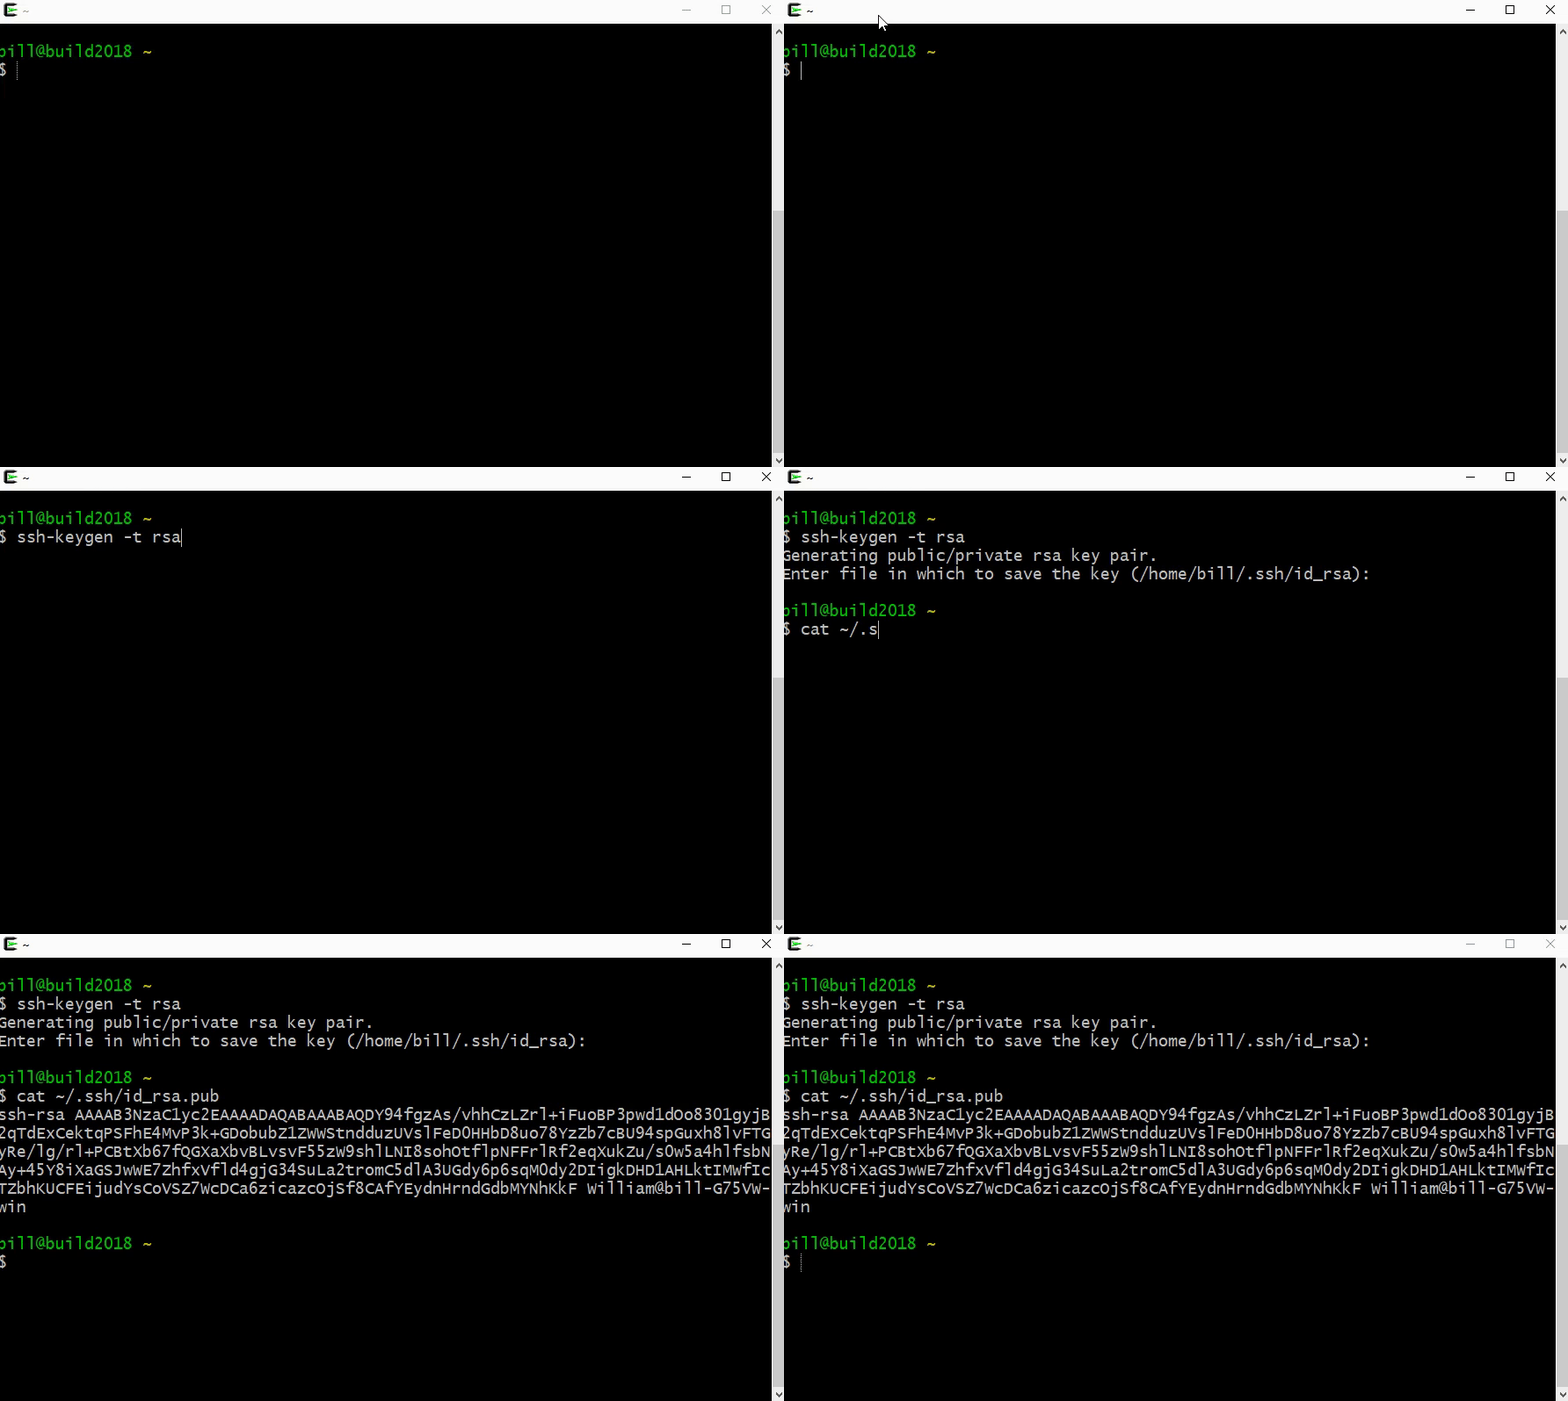
SSH Keys allow you to present a certificate to the GitHub server that authenticates your user account from your computer. It is an alternative to password-based authentication. You can create an SSH key, which will create two files on your “home directory” called .ssh/id_rsa and .ssh/id_rsa.pub. The .ssh/id_rsa.pub file contains your public key and is the file you will share with GitHub. The private key in the other file corresponds to your public key, and, as the name implies, should not be shared with anyone (as it will enable authentication against the public key).
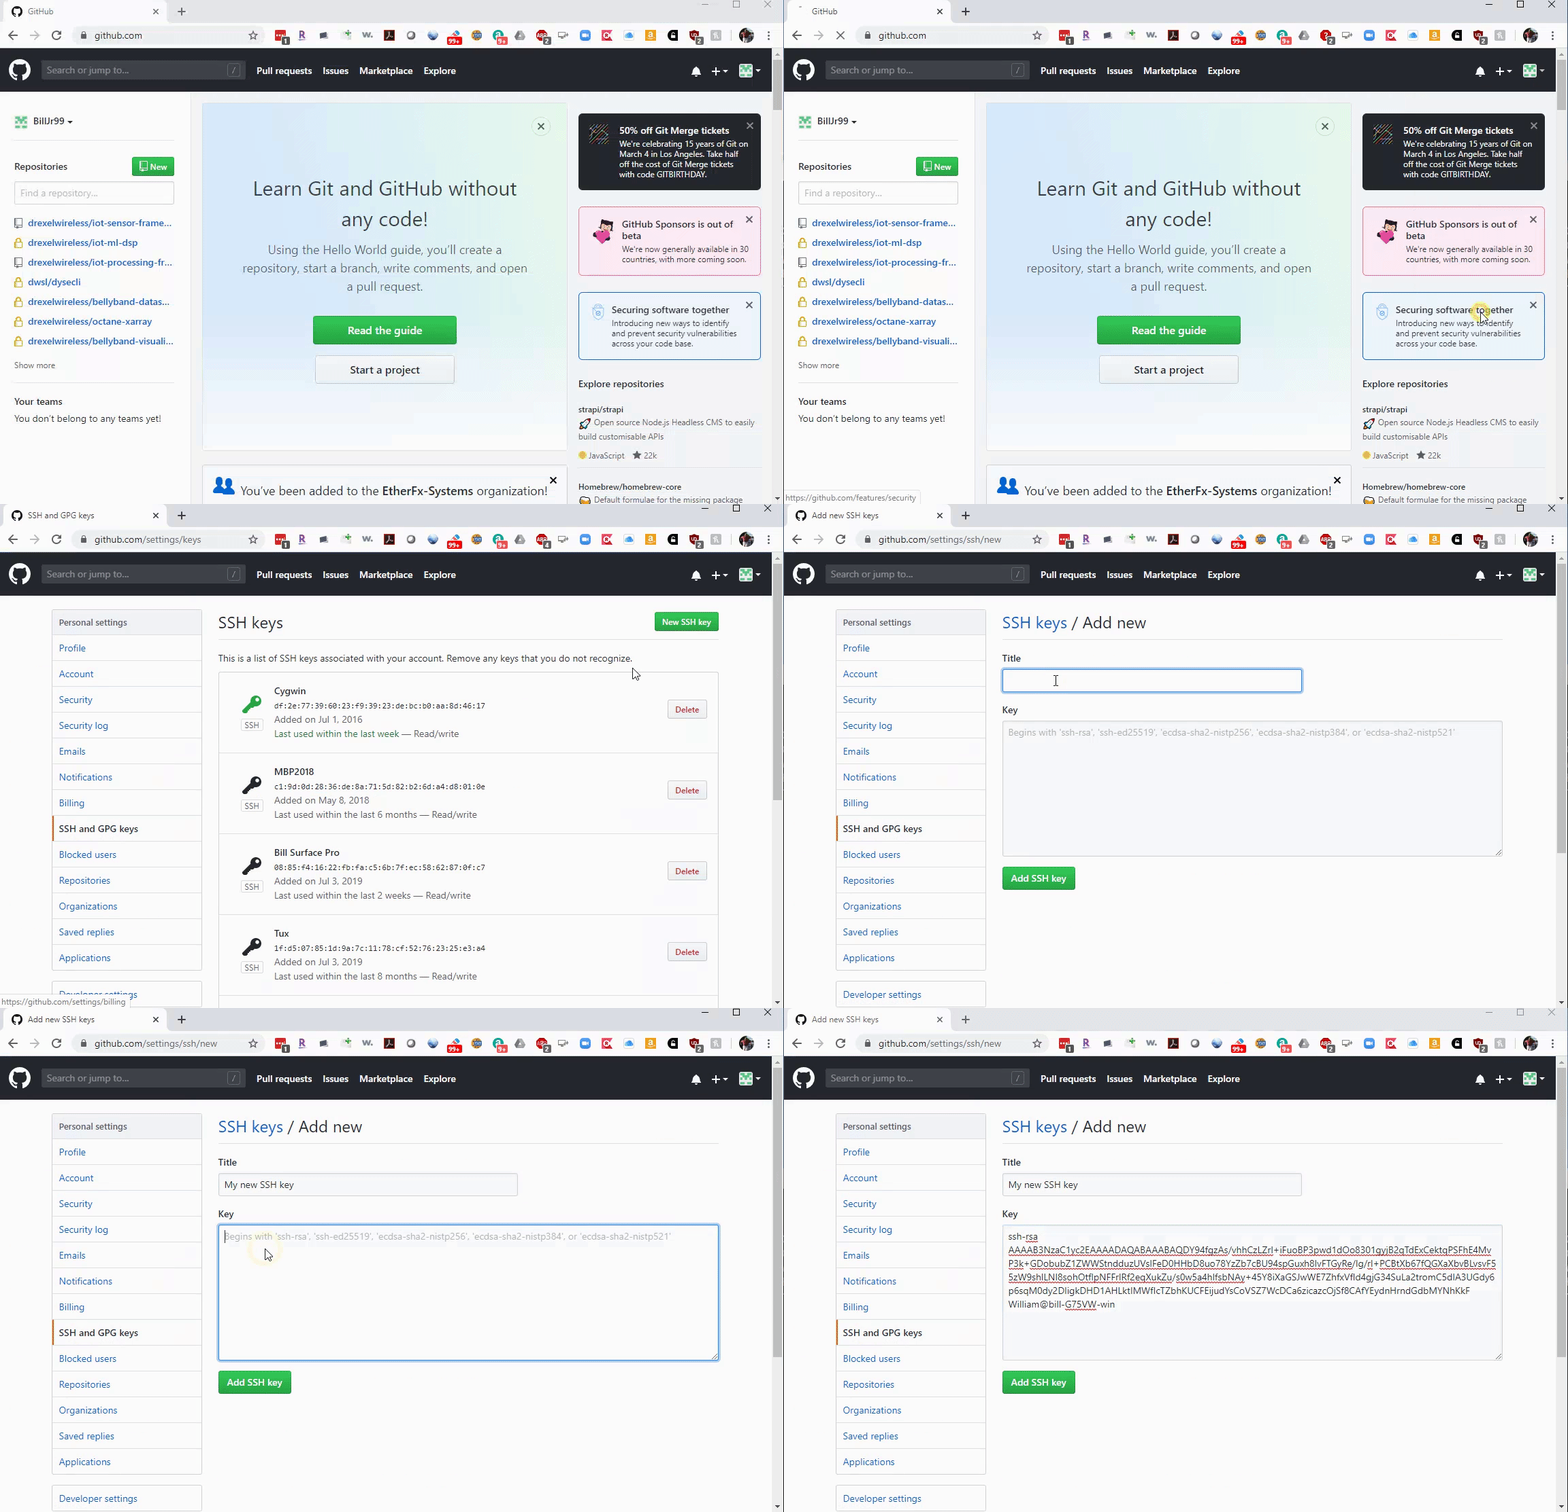
Once the key is created, you can copy the public key text and paste it on the GitHub website to add it. It’s a good idea to name the key, in case you get a new computer and start a new key; it’s a good practice to remove unused public keys from GitHub and other servers.
If you are using TortoiseGit, you can use a tool to manage your SSH keys from Windows. See this article for details.
The video below demonstrates how to create and add your ssh key to your github account.
Summary
In summary, you can execute the following commands to create an SSH Key.
ssh-keygen -t rsa
cat ~/.ssh/id_rsa.pub # outputs your public key so you can copy and paste it
Copy this key and paste it into your github user settings menu under SSH Keys. You can now execute ssh commands that login to your account without typing in your password! These keys allow you to encrypt data: data are encrypted using your public key by anyone in the world, and decrypted using your private key (which only you have).
Interestingly, you can encrypt data with your private key, which will prove to the world that you generated that data. This is because anyone with your public key can decrypt your message, and only you could have generated it with your private key. This is known as generating a digital signature, and it is used to facilitate passwordless login.
Treat your private key like a password! If you lose it, you should generate a new one and remove the old public key from any services you use.
Configuring your git Client
You can add your name and email address to your git client by running these commands, which will associate your commits to the repository with you.
git config --global user.name "Your Name"
git config --global user.email "your.name@email.server"
Creating and Sharing a git Repository
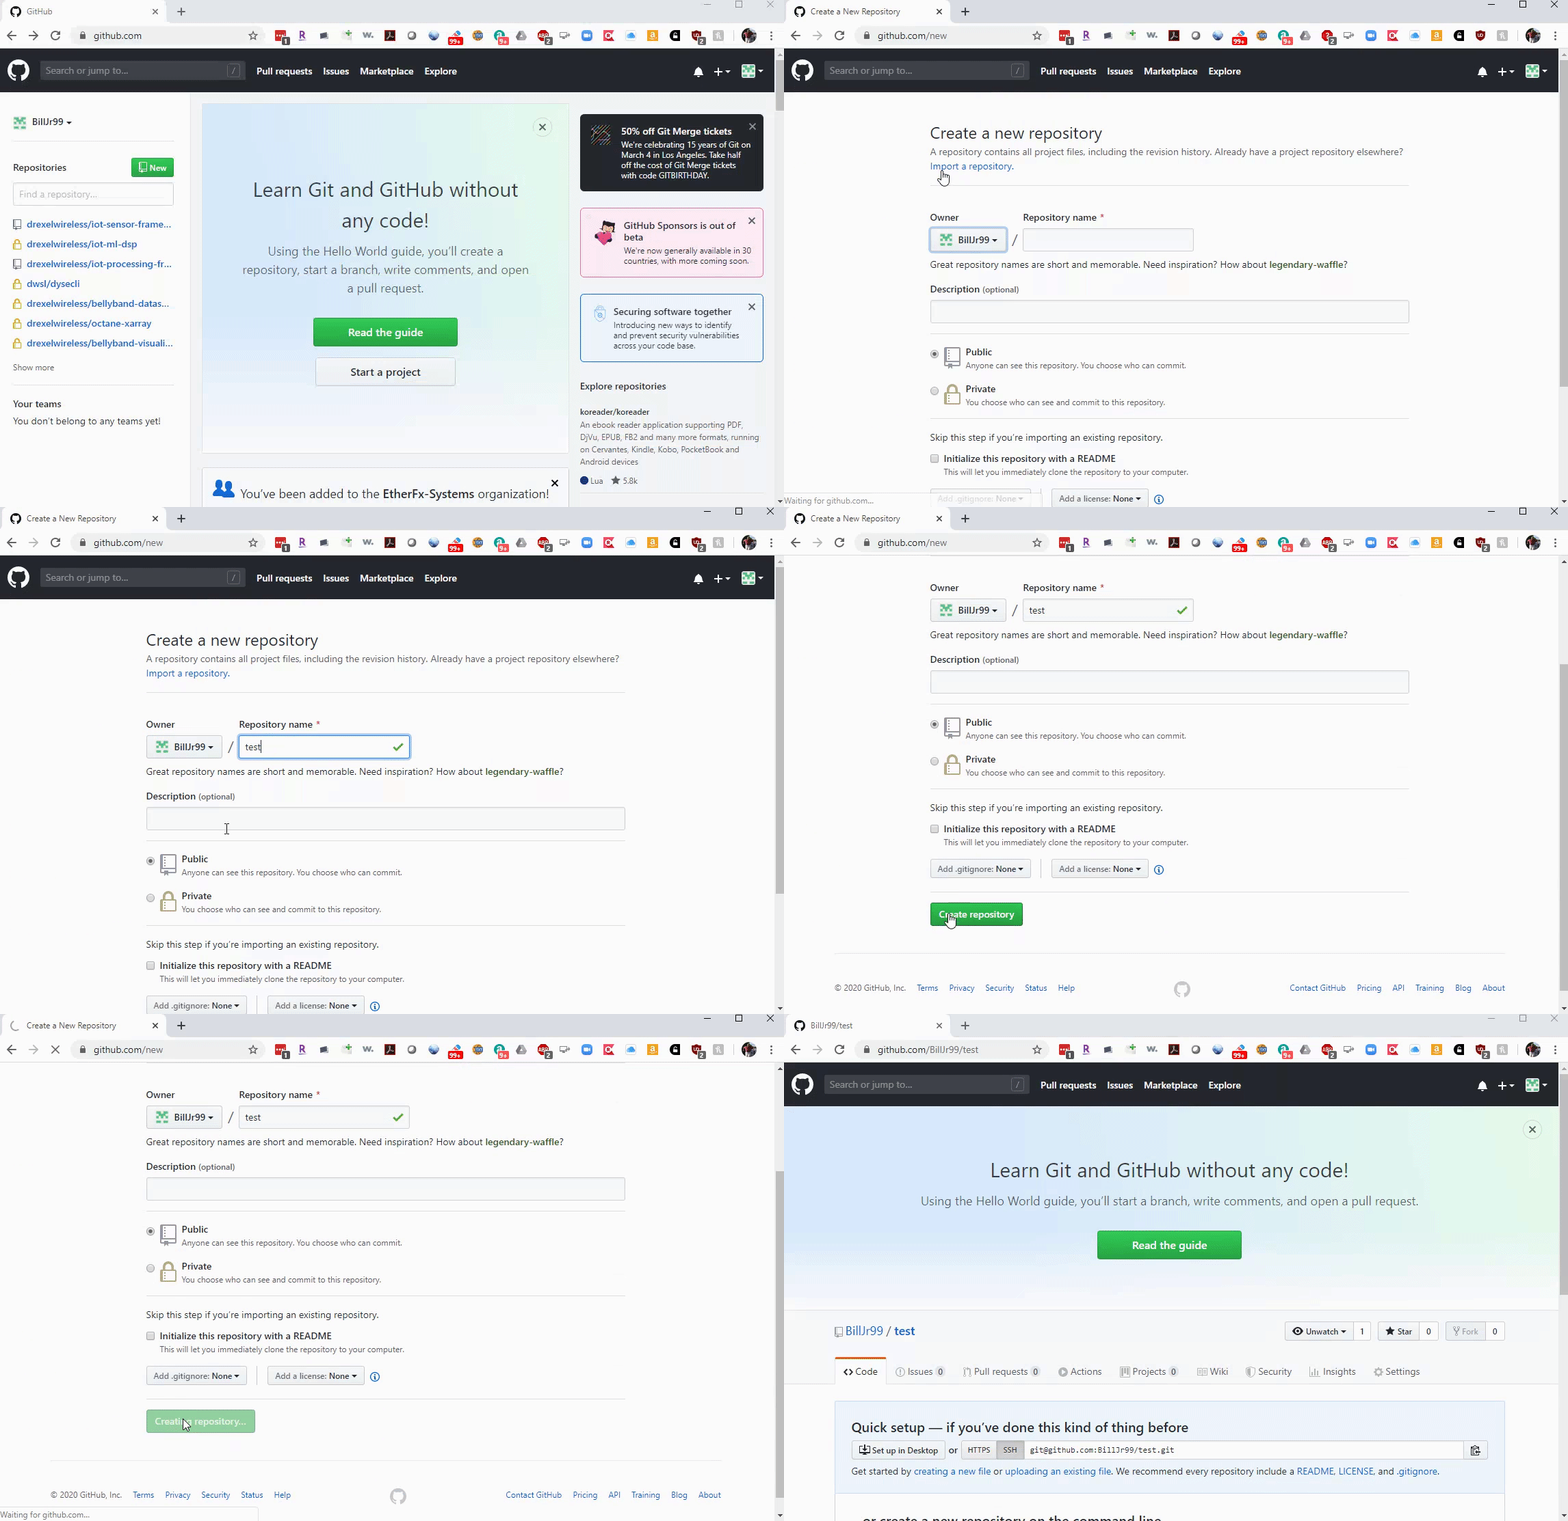
Follow the steps below to create a github repository. Your project will present you an ssh link (do not use the https link) under the “Code” button once you create the project.
Checking out your Repository
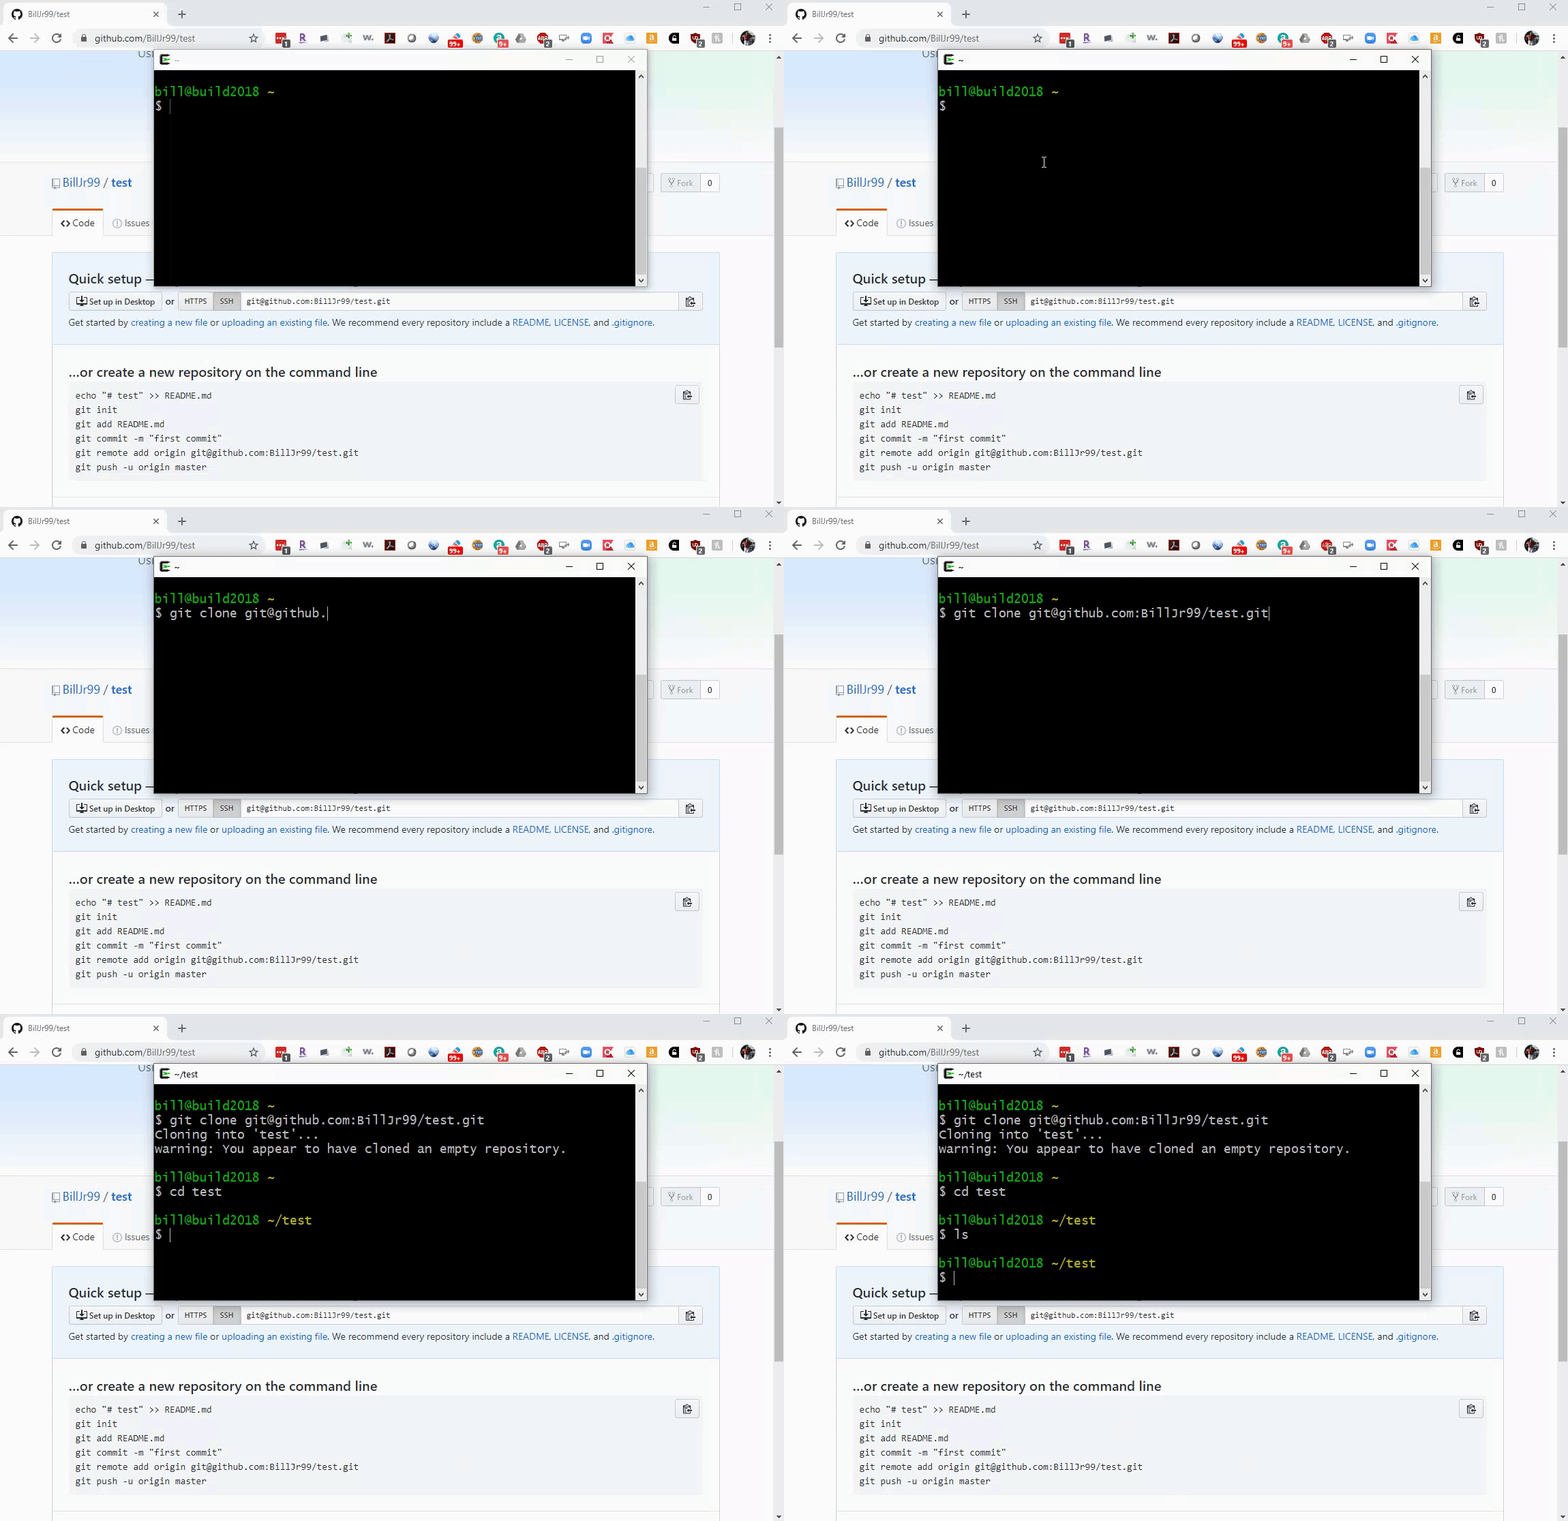
Cloning the repository downloads it to your local computer. You can do this as many times as you wish, and synchronize across them.
You can even share the repository with other users, and they can operate on the repository locally as well. To do this, click the menu button from your repository page, and select Settings. Go to the Collaborators menu from here, and add the username or email address of the user you want to share your repository with. You can share with multiple collaborators, and give each varying degrees of access to your repository.
Pushing and Pulling to your Repository
Sometimes, you’ll have private files in your repository directory that are important, but too sensitive (or just custom to each local computer) to save to the remote repository in the cloud. For this reason, you’ll explicitly add each file that you want to upload to the cloud. Note that you also add files that you’ve modified even if they already exist.
Once you’ve added your file(s), you can commit your changes to the repository. This creates a log timestamp that you can see in the repository to track who did what and when. You can even roll back your repository to any point in time marked by one of these commits. It’s a good idea to commit relatively often, whenever a major milestone is reached that you might like to revert to or review someday. It’s also a good idea to specify a commit log message so that these commits make sense beyond simply what files were modified and how. This is specified with the -m flag to git commit.
Before git came along, repositories would often automatically sync to the remote in the cloud as soon as a commit was made. This might even seem reasonable at first glance. But not all computers are connected to the Internet at all times, and so it is helpful to separate these operations so that you can make commits while offline. After you have made one or more commits, you can push them to the remote in the cloud.
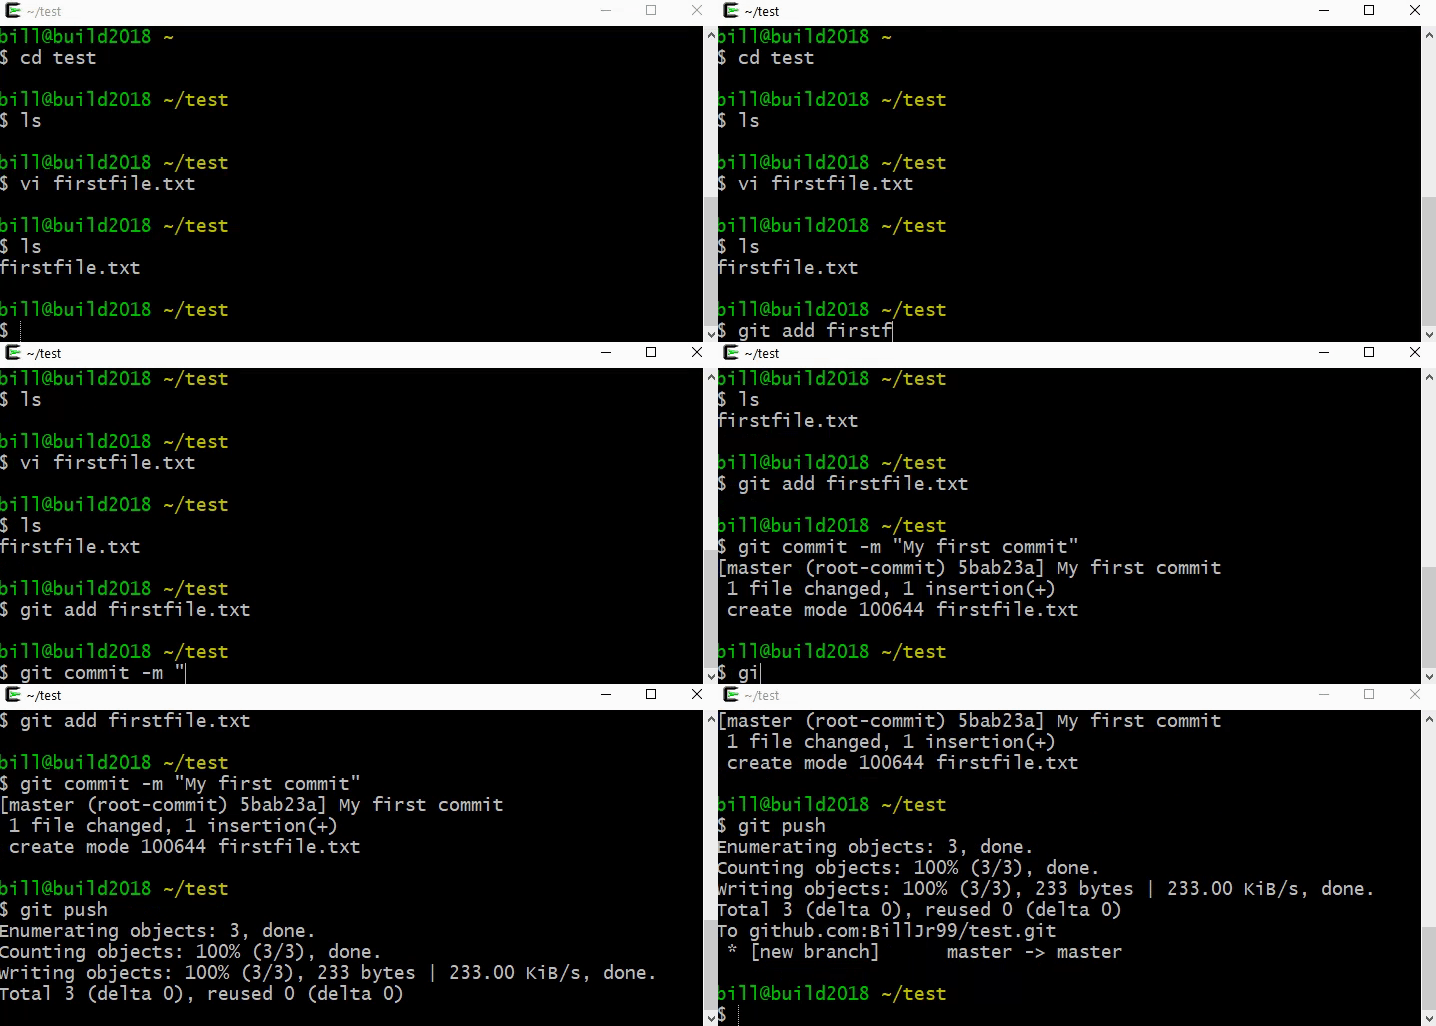
It is strongly recommended that you pull from the repository with a git pull command prior to pushing your own commits using git push to resolve any conflicts that may exist. More on this later.
Removing Files
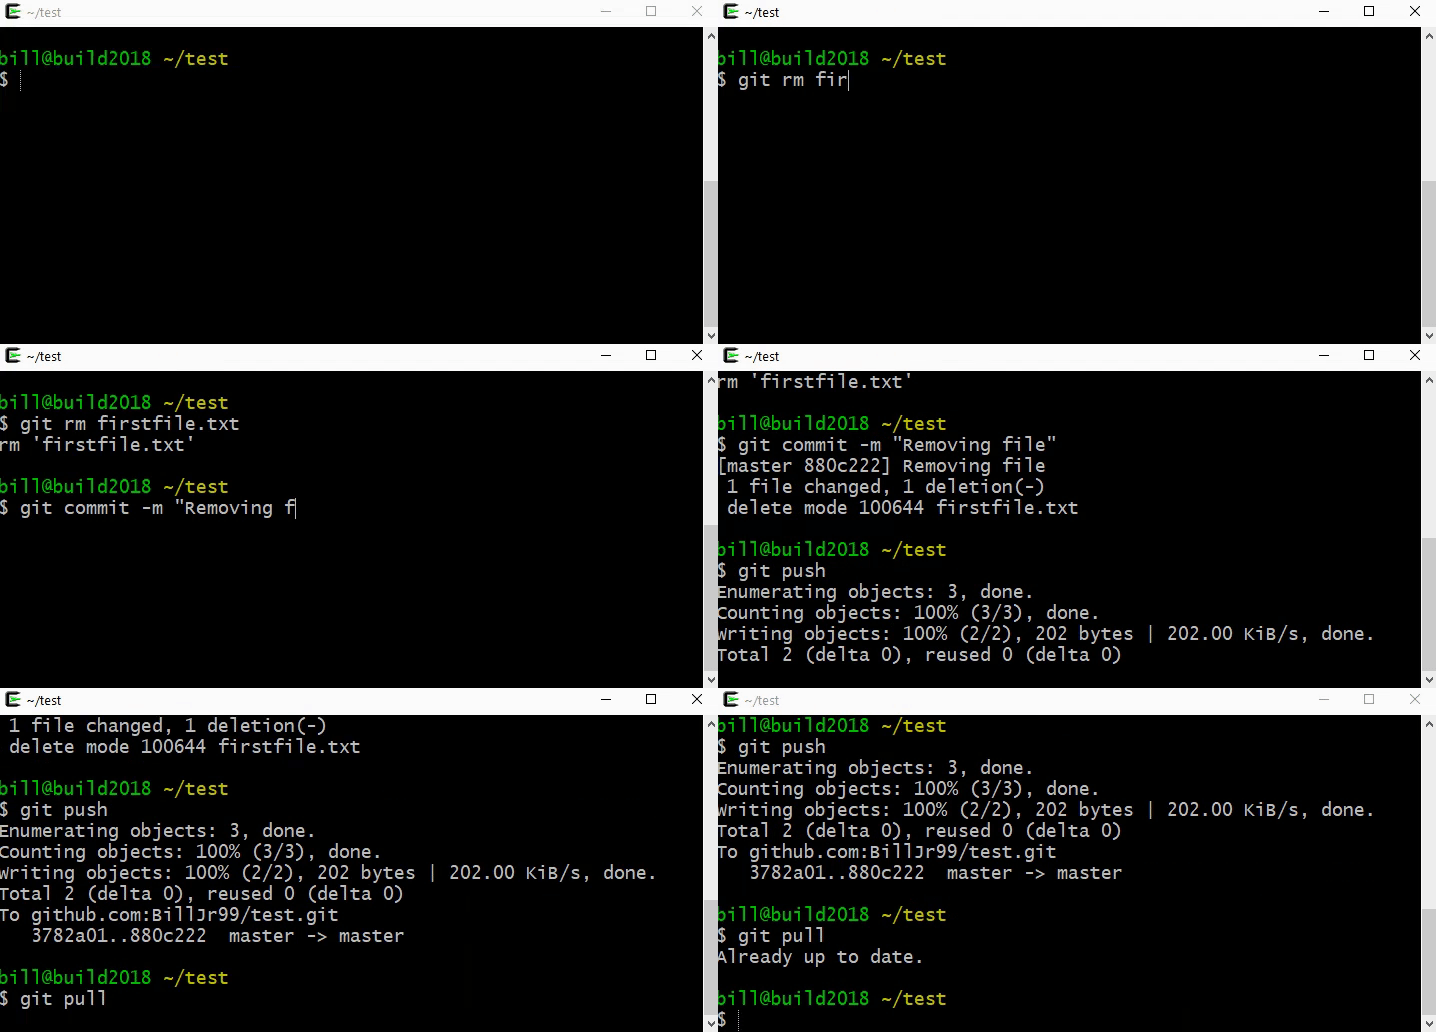
In addition to adding files, you can also remove files from the repository with git rm. You’ll commit and push these changes just like with add operations.
One final note: it’s a good practice to pull the repository from the remote cloud before performing a push operation. In fact, it’s required if anyone else has pushed commits that you have not yet downloaded. You can use the git pull command to do this, and should plan on doing this at least any time you push.
Inspecting Your Work: status, diff, and log
Before you add and commit, you should always look at what you are about to save. Three commands answer “what changed?” at increasing levels of detail.
git status is the one you will run most often. It tells you which branch you are on, which files are modified, and which are staged (added with git add and ready to commit):
git status
git diff shows the actual line-by-line changes. By default it shows changes you have not yet staged; add --staged to see what you have already added and are about to commit:
git diff              # changes in your working directory, not yet staged
git diff --staged     # changes you have staged and are about to commit
Reading the diff before every commit is the single best habit for avoiding “oops” commits – a stray debug print, a secret, or an unrelated change sneaking in.
git log shows the commit history. A few flags make it far more useful:
git log --oneline            # one line per commit -- a quick overview
git log --oneline --graph    # ...with an ASCII graph of branches and merges
git log --since="1 week ago"  # only recent commits (this is what standup.sh uses above)
Creating a Branch
Things can get messy if there are many people working on many different parts of a repository with different objectives in mind. It is nice to have a “sandbox” to work in that is separate from the rest of the team, and then to merge that sandbox back into the main repository when you are finished. These “sandboxes” are called branches. You can create a branch using the git branch <branch name> command, and switch between branches using the git checkout <branch name> command. Git provides a shortcut when creating a new branch that executes both operations: git checkout -b <branch name>.
Initially, the branch will be identical to the current branch, but it will be on its own independent commit timeline.
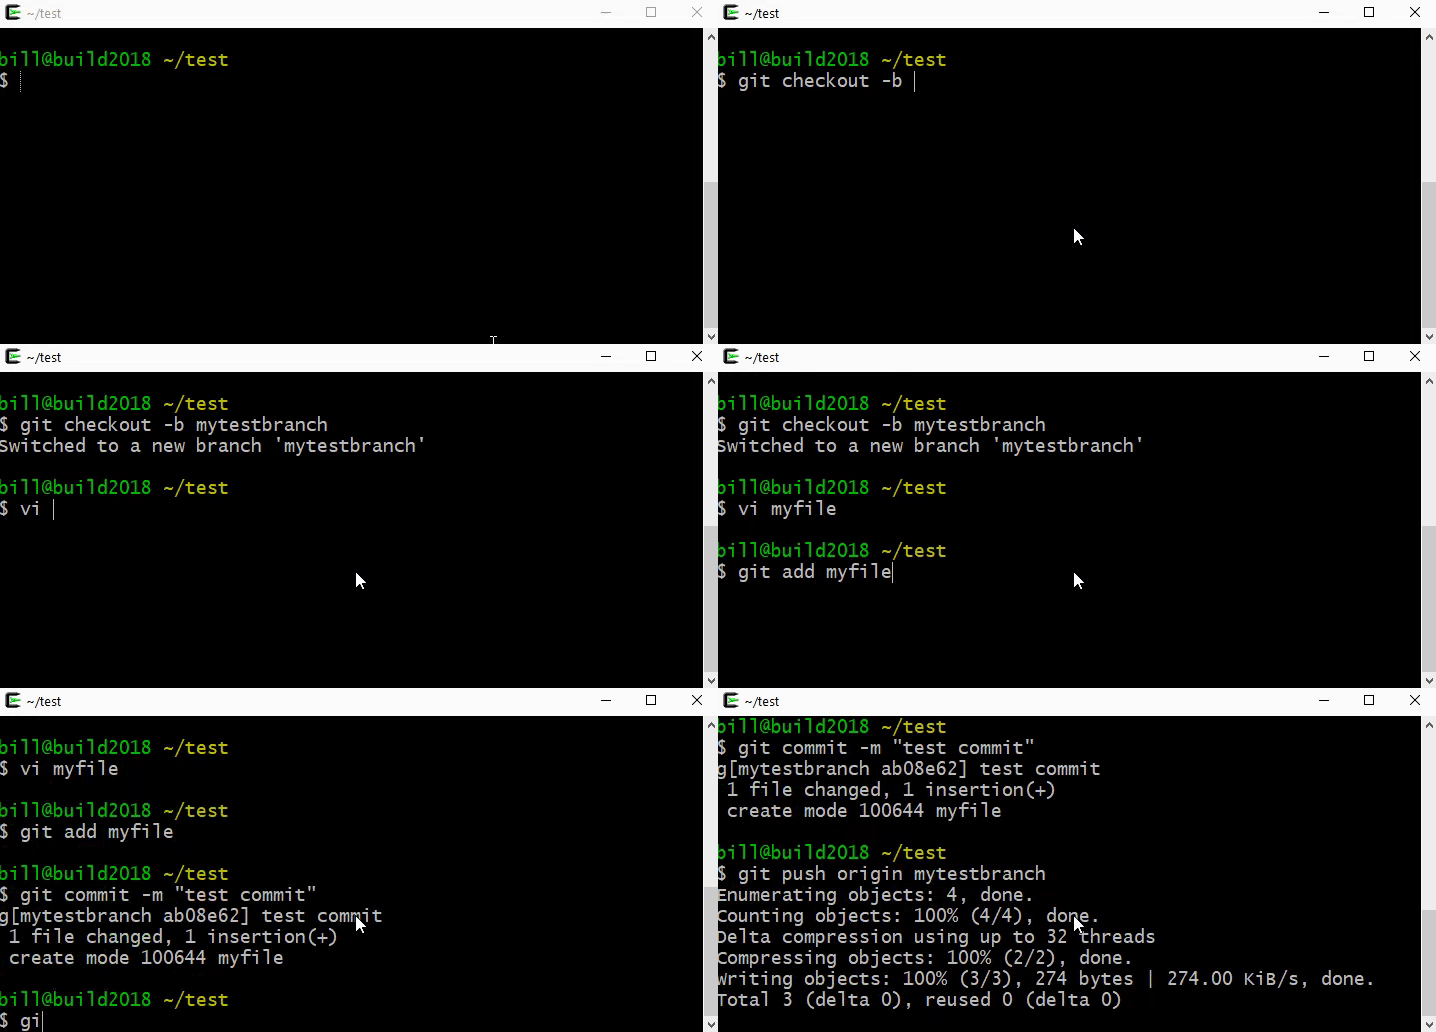
You can commit and push to your branch like before. When pushing to (or pulling from) a particular branch, you can specify the branch to git via git push <remote> <branch name>. By default, the GitHub remote is called origin, so you would enter git push origin <branch name>. You can have more than one remote, which would allow you to sync with multiple remote servers or to create custom actions to occur when you push commits. This is beyond the scope of this article as we won’t need it for GitHub classroom, but if you’re interested, you can find out more here.
With GitHub, it’s possible that a single user or subset of users are in charge of the main branch, into which these branches would often be merged. To request a code review and merge of a branch, you can create a Pull Request that seeks a review, comments, and ultimately a merge of the branch.
Merging a Branch
You can merge a branch into your existing branch using the git merge <branch name> operation. You can checkout the target branch first, and then merge the other branch in.
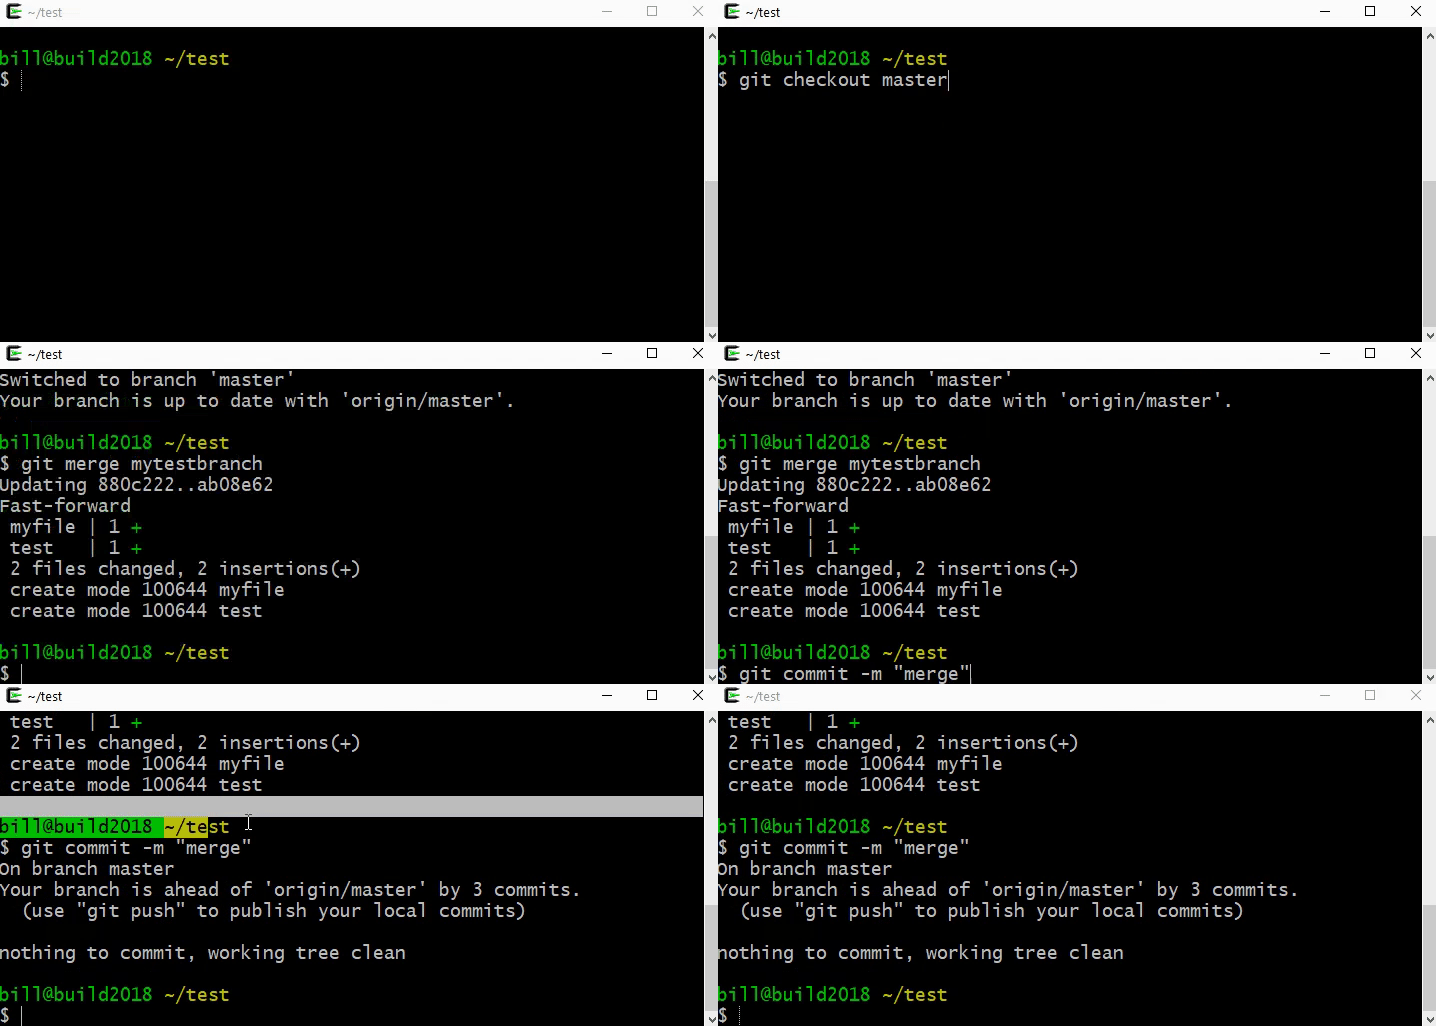
Notice that you do not need to commit after performing a merge: the merge is a commit on your current branch. If you perform a git commit, it will provide you a helpful reminder about this. Instead, you can go ahead and push to the remote GitHub server when you are ready.
Resolving a Conflict
Sometimes, team members make changes to the same parts of the same files in different branches (or from different local checkouts). A conflict occurs when this happens. Git offers you some guidance in how to resolve these, and allows you to specify the details as a new commit. You can find more details on how to do this here.
At the console, you can edit the file in conflict and manually resolve the conflict. The file will show the conflict like this:
<<<<<<<
Data on the server
======
Data from your local commit
>>>>>>>
Alternatively, you can type git checkout --theirs to use the server copy and overwrite your changes, or git checkout --ours to use your version. Add, commit and push the repository like you would for any other modified file.
Tracking Work with Issues
Real teams do not keep their to-do list in their heads; they track it where the code lives. A GitHub Issue is a unit of work – a bug, a feature, or a question – with its own discussion thread. From your repository’s Issues tab, click New issue, give it a clear title and description, and then organize it with:
- Labels (
bug,enhancement,documentation) to categorize work, - Assignees so exactly one person is responsible,
- Milestones to group issues into a sprint or release (this pairs naturally with your project’s Gantt chart).
The payoff comes when you connect issues to code. If you write Closes #12 (or Fixes #12) in a commit message or pull request description, GitHub will automatically close issue #12 when that work merges into the main branch – linking the conversation about what to do to the commit that actually did it.
Pull Requests
Earlier you created branches and merged them locally. On a team, you rarely merge your own work straight into main; instead you open a Pull Request (PR) so a teammate can review it first. A PR is a request to merge one branch into another, with a built-in place for discussion, review, and automated checks. The full loop looks like this:
- Create a branch and do your work:
git checkout -b add-login. - Commit and push the branch to GitHub:
git push origin add-login. - On GitHub, click Compare & pull request. Describe what changed and why, and reference any issue it resolves (
Closes #12). - Request a review from a teammate. They can comment on specific lines, ask questions, and either Approve or request changes. You push more commits to the same branch to address feedback – the PR updates automatically.
- If your project has Continuous Integration set up, its test suite runs on the PR automatically. A green check means the tests passed; a red X blocks the merge until you fix it – this is the safety net that keeps broken code off
main. - Once the PR is approved and the checks are green, click Merge. GitHub offers a normal merge, a squash (combine the branch’s commits into one), or a rebase. Then delete the branch – its history is preserved in the merge.
To make review mandatory on your team’s shared repository, an administrator can turn on branch protection for main (Settings, then Branches): require a pull request and at least one approving review before merging, and require the CI check to pass. You can also add a CODEOWNERS file so the right teammate is automatically requested for review. This branch -> pull request -> review -> merge cycle is the everyday workflow of professional software teams, and it is exactly how you should collaborate on your course project.
What to Do
- Practice at the command line: navigate your filesystem with
cd,ls, andpwd; create a directory; and use a pipe (for example,ls | wc -l) to answer a question about your files. - Write and run the
standup.shscript from the Writing a Shell Script section above, and run it against a teammate’s commits. - Create a git repository and share it with the members of your group. Everyone should do this individually!
- Commit files to everyone’s repositories, including your own. Before each commit, run
git statusandgit diffto review what you are about to save. - Create a branch, make some edits, and merge the branch.
- Create a conflict, resolve it, and check in the resolved file.
- On a teammate’s repository (where you are a collaborator), open an Issue describing a small change. Create a branch, make the change, and open a Pull Request whose description says
Closes #<your issue number>. Have your teammate review, approve, and merge it, then confirm the issue closed automatically. - Share the repository with the instructor, who can verify your work using your git commit history. Submit the git ssh link.
- Create a branch in your repository called gh-pages, and add a file called index.md. Put some text into that file, commit and push it. In the settings for your repository, enable github pages, and go to https://your-git-username.github.io/your-github-repository-name. You should see your content!
Submission
In your submission, please include answers to any questions asked on the assignment page, as well as the questions listed below, in your README file.
If you wrote code as part of this assignment, please describe your design, approach, and implementation in a separate document prepared using a word processor or typesetting program such as LaTeX. This document should include specific instructions on how to build and run your code, and a description of each code module or function that you created suitable for re-use by a colleague.
In your README, please include answers to the following questions:
- Describe what you did, how you did it, what challenges you encountered, and how you solved them.
- Please answer any questions found throughout the narrative of this assignment.
- If collaboration with a buddy was permitted, did you work with a buddy on this assignment? If so, who? If not, do you certify that this submission represents your own original work?
- Please identify any and all portions of your submission that were not originally written by you (for example, code originally written by your buddy, or anything taken or adapted from a non-classroom resource). It is always OK to use your textbook and instructor notes; however, you are certifying that any portions not designated as coming from an outside person or source are your own original work.
- Approximately how many hours it took you to finish this assignment (I will not judge you for this at all...I am simply using it to gauge if the assignments are too easy or hard)?
- Your overall impression of the assignment. Did you love it, hate it, or were you neutral? One word answers are fine, but if you have any suggestions for the future let me know.
- Using the grading specifications on this page, discuss briefly the grade you would give yourself and why. Discuss each item in the grading specification.
- Any other concerns that you have. For instance, if you have a bug that you were unable to solve but you made progress, write that here. The more you articulate the problem the more partial credit you will receive (it is fine to leave this blank).
- Please describe any use of outside resources you may have engaged in the completion of this assignment, including the use of generative Artificial Intelligence.
Please refer to the Style Guide for code quality examples and guidelines.